
Welcome to and thank you for joining this Wrapped in Jamie CAL. I am soooo excited to share this Crochet Along with you.
Wrapped In Jamie is my first “bigger” design and the first CAL I have attempted. I have been working on this project for over a year until the time I started to release the first pattern. And that was mainly just designing and writing the pattern down. I will be writing an extra post about my experience as a first-time CAL-hoster. It was – and at the time of writing this, still is – quite the journey!
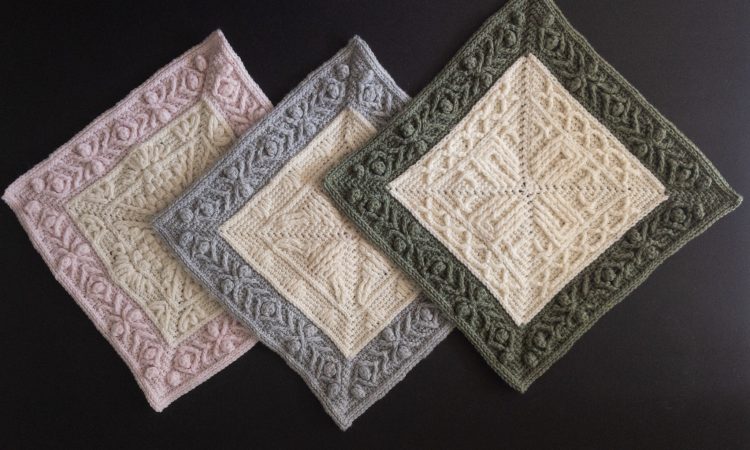
Together, with many other wonderful people from all around the world, we will use the squares from this CAL to create a shawl, a blanket, a scarf, a throw or anything you can come up with to make from a number of Afghan squares.
My aim with this CAL is to provide patterns that are challenging, yet provide all kinds of support possible to make it doable for anyone who is at least confident with the basics of crochet, for example an adventurous, advanced beginner.
The support offered includes tutorials for special stitches, crochet techniques that may be new to you and especially our very own featured Image Overlay Crochet (IOC) ‘Petranese’ terminology. We are talking detailed step-by-step photo tutorials, video lessons and even master classes.
I hope we will have a lot of fun working together on our respective projects.
I consider Wrapped In Jamie a Level 2 CAL. You can read about my CAL Level Classification here.
Important Update
Squares 1-6 are written in the ‘old Petranese’ – a system that uses numbers and letters to describe the stitch placement.
Squares from S7 onwards are written slightly differently in Image Overlay Crochet ‘Petranese’ terminology, which we believe to be easier to read and translate.
Squares 1-6 will be updated as we go. Patterns in the shop will be clearly marked OLD and NEW. If you purchased an old pattern, you will automatically be sent the NE(meaning updated to the new terminology) pattern as soon as it is released.
The squares will look the same, only the writing of the pattern/use of the terminology is different. Please make yourself familiar with the ‘NEW’ Image Overlay Crochet (IOC) terminology ‘Petranese’ as eventually all patterns will be available in the NEW Petranese only.
General Information
Introduction
Wrapped in Jamie refers to the characters in Diana Gabaldon’s Outlander novel series. It is the story of a woman, Claire, who accidentally falls through time in a stone circle in Scotland. Now, 202 years earlier, she meets Jamie, a young Highlander. While they experience many adventures and challenges, they fall in love with each other.
If you don’t know the story yet – read the books, watch the videos or listen to the audio books while wrapping yourself in Jamie! If you do know the story, well, just enjoy it again!
One day, while I was crocheting a simple project and listening to the last of the currently available audio books, I was wondering what I could crochet and listen to next. I did not want the story to end and thought how nice it would be to “crochet the story”. It is my core belief that “Everybody’s got a Story”, and I wondered what this specific story would look like, if it were translated into a crochet pattern. Hence, the idea for an Outlander Pattern Collection with 12 designs was born, which later grew into the Wrapped In Jamie CAL – with 20 different squares, a big Claire Square, additional three sizes of triangles and three different suggestions for a border.
Each of the squares has its own ‘Background Story and Designer’s Thoughts’ page. Here is a link to an overview of the stories that have already been published: https://blacksheepcrochet.com/design-background-stories/
Pattern Access and Availability
The English (US terms) version of this CAL is available for free on the website https://blacksheepcrochet.com. You can find a free (US terms) pattern page for each of the squares that has been released so far on the website. An add-free PDF including an extensive photo tutorial with step-by-step instructions for each pattern is available in the shop. These PDFs also include a crochet chart, which does not use your typical crochet symbols, but is a chart specifically designed to make reading our featured Image Overlay Crochet (IOC) ‘Petranese’ terminology almost intuitively easy.
https://blacksheepcrochet.com/product-category/wrapped-in-jamie-cal/
Additionally to the extensive step-by-step photo tutorials you can watch right- or left-handed versions of the video tutorial. You can find the links to them either on the respective free pattern page on my website, in the pattern PDFs or in the Black Sheep Crochet YouTube Channel https://www.youtube.com/channel/UCJ3yOPrTEqkOFPZjrCCovbQ .
Acknowledgement
I would like to express my deepest gratitude to all the people who have supported Wrapped in Jamie by saying a huge THANK YOU to the editors, testers, translators, page moderators, tech support and everyone who helped to make this huge project an ‘outlanding’ experience. You will ‘meet’ them during the CAL as we go along. Please check out their fabulous work, too
Wrapped in Jamie Pattern Release - The Seasons
Just like the TV-series of Diana Gabaldon’s Outlander novels, this CAL is divided into three ‘Seasons’. You may choose to crochet all parts, but you don’t have to. This project offers you lots and lots of possibilities – you can use all or only some of the squares, make a stand-alone project from each season’s squares, mix and match as many or as little squares from each season as you like or do ‘the lot’ and make one huge blanket. Some suggestions are listed here: https://blacksheepcrochet.com/wrapped-in-jamie-cal-project-options/
Season 1 shows you 11 different stages in Jamie’s life. It tells you about the things that are important to Jamie and/or had an impact on shaping him into the man he has become when he ‘meets’ Claire in Square 12. The (optional) square border is also part of the patterns in this season. You can make a nice wrap, shawl or scarf or even a blanket with these 12 squares only. A simple project border is included that will keep the focus on the square designs.
https://blacksheepcrochet.com/wrapped-in-jamie-cal-yardage/ includes suggestions for choosing colours and tables that give you the amount of yarn you need for three sample weights (fingering, DK and Aran). There is also an instruction on how to calculate the yarn you will need for your project, as well as sample sizes with the different types of yarn.
All Season 1 squares are listed here: https://blacksheepcrochet.com/wrapped-in-jamie-cal-season-1-squares/
Season 2 gives you the big Claire Square and another eight small squares, still relating to Jamie, Claire, but mainly to Scotland. A new square border is designed for these new squares as well. We will also show you some new layout options and a new project border to suit your old and new project options.
Unexpectedly, but most welcome, Veronika Gadulova has joined us as a collaborating designer for Season 2. She is contributing another four squares plus a different square border, specifically designed for her beautiful squares.
So with two additional square borders, Claire, 12 squares and a 12-fold surprise plus a new project border to suit, this is going to be the biggest Season of them all.
Claire has already been released in 4 parts, which you can find here:
https://blacksheepcrochet.com/?s=claire&post_type=product
The Season 2 squares can be found here:
https://blacksheepcrochet.com/wrapped-in-jamie-cal-season-2-squares/
Season 3 brings it all together with a set of three different sized triangles, which you will need if you choose to finish our largest project suggestion – the Diamond Kilt Claire 20. I will also show you how to finish with a larger outer project border option.
You can find a detailed overview of the seasons on the website:
The Project and Your Options
The idea for this project is to create an accessory you can wrap yourself in – hence Wrapped in Jamie. Everything will be provided in the patterns to give you lots of different options. You can make a square or rectangular blanket, a long scarf, a triangular shawl, a plaid-like throw or realise your very own idea.
You will find lots of resources on my website, like layout suggestion sheets (with and without square numbers) that you can download and use to plan your project and your colourways.
First Steps and my suggestion on how to approach this CAL
There is a Wrapped In Jamie Resources page with step-by-step instructions how to prepare for this CAL and links to all related pages.
Here is a recap:
- Read this Introduction (check!)
- Get yourself acquainted with our featured Image Overlay Crochet (IOC) ‘Petranese’ terminology. The basics are explained here:
Image Overlay Crochet Basics 1
https://blacksheepcrochet.com/petranese-explained-basics/
and here: Image Overlay Crochet Basics 2
https://blacksheepcrochet.com/petranese-explained-basics-2-stitches/
Alternatively, you can download a free PDF here:
https://blacksheepcrochet.com/product/petranese-explained-basics1/
There is also a constantly growing library of special stitch and technique tutorials:
https://blacksheepcrochet.com/crochet-tutorials/
Each pattern includes all the explanations you need to be able to make it. - Choose your layout. https://blacksheepcrochet.com/wrapped-in-jamie-cal-project-options/
- Choose your colourway (Jamie, Scotland, Claire or your very own).
https://blacksheepcrochet.com/wrapped-in-jamie-cal-colour-inspiration-from-the-story/ - Choose your yarn or get one of the yarn kits we have put together for you.
https://blacksheepcrochet.com/wrapped-in-jamie-cal-yarn-kits/ - If you decide on choosing your own yarn, check the required yardage.
https://blacksheepcrochet.com/wrapped-in-jamie-cal-yardage/ - Read through the complete pattern on the website or download the ad-free US terms PDF for a small contribution*.
https://blacksheepcrochet.com/shop/ - Read the complete round before you start crocheting it. Make yourself familiar with the special stitches mentioned in each round. IF you need help, check out our tutorials
https://blacksheepcrochet.com/crochet-tutorials/ - Get into it. The best way to learn is to do ;-)! If you have questions, consider joining our special Wrapped in Jamie Facebook group, where lots of helpers are available to answer your question or it may already have been answered.
https://www.facebook.com/groups/363802097645087/
*You are not required to purchase the PDF as each Wrapped in Jamie pattern is (or will be) available for free on the website. You may, however, find a print version more convenient – easier to mark your progress or make notes, and you can access the patterns offline. They also contain exclusive resources like visuals, photo tutorials and the chart, which are really useful tools to work with.
Plus, when you purchase a pattern you support my work as a designer, which is much appreciated. Thank you!
Difficulty level
The project is classified as intermediate, but Season 1 was designed to suit an inquisitive beginner or intermediate crocheter. Most stitches are basic and special stitches are usually explained in detail.
There will be video tutorials for all squares, which should make following along even easier.
For those who prefer charts, we have you covered too. Our specifically designed crochet charts can almost intuitively be read and together with the written pattern, they are close to being fail-proof.
Season 2, starting with Claire, is more intense though and definitely not for making while watching TV. If you have worked through Season 1, you have gradually grown into the techniques and you can probably easily find your way back into the pattern (writing) style.
Our Masterclasses are a great way to acquaint yourself with the terminology or as a refresher after a break. You can find more information on them soon.
What You Will Need
Gauge is not important for this project but using the same weight of yarn for all parts (inner squares, square border, Claire square, triangles and project border) is. Make sure you have enough yarn in each chosen colour to finish your project.
- Yarn – (refer to the table ‘Yarn requirements’ to help calculate the amounts you need) – https://blacksheepcrochet.com/wrapped-in-jamie-cal-yardage/
- Crochet hook – make a swatch and check if the suggested hook size specified on the yarn label will give you the drape, stitch definition and firmness you prefer for your final project. Everyone has a different tension, so it is always a good idea to try which combination of hook size and yarn suits you best.
- Scissors
- Tapestry/Yarn needle
- Stitch markers (optional but recommended – they can even be yarn scraps in a contrasting colour, paper clips or hair pins)
The Patterns
The patterns are kept as easy as possible, using only the most basic stitches. Special stitches are usually just a combination of basic stitches, like front posts, or i.e. pairs of trebles crocheted together in different combinations. They are always listed and explained in the first part of every pattern and before the round they are used in. The Outlanding Stitch Compendium (free PDF in my webshop) gives you an overview of the basic stitches and their variations, and it will teach you how to read my “Petranese system” of special stitches. Please make yourself familiar with this system before diving into the CAL.
https://blacksheepcrochet.com/product/outlanding-stitch-compendium-for-the-wrapped-in-jamie-cal/
Patterns are written by and for right-handed crocheters. However, they are all symmetrical, and instructions for left-handed crocheters are added where necessary. Please reach out if you need more support. We have lefties in the community who are happy to help you with left-handed specific questions.
Stitches are always made in both loops unless stated otherwise. When a stitch is made in front, behind or around another stitch in a different round, the corresponding stitch of the current round will be considered as worked and must therefore be skipped. This is very important to remember, as it is not mentioned in each round!!!
Example: sc, fpdc, sc reads as follows: single crochet, front post double crochet, single crochet.
The extended version of this would read: sc, fpdc, skip 1 st, sc in next st.
In order to avoid confusion, it is assumed that when you work a stitch other than in the current round, the corresponding stitch must be skipped in order to avoid unnecessary increases: increases are ONLY made in the corners.
Every Wrapped in Jamie pattern starts with a short reminder of the essentials!
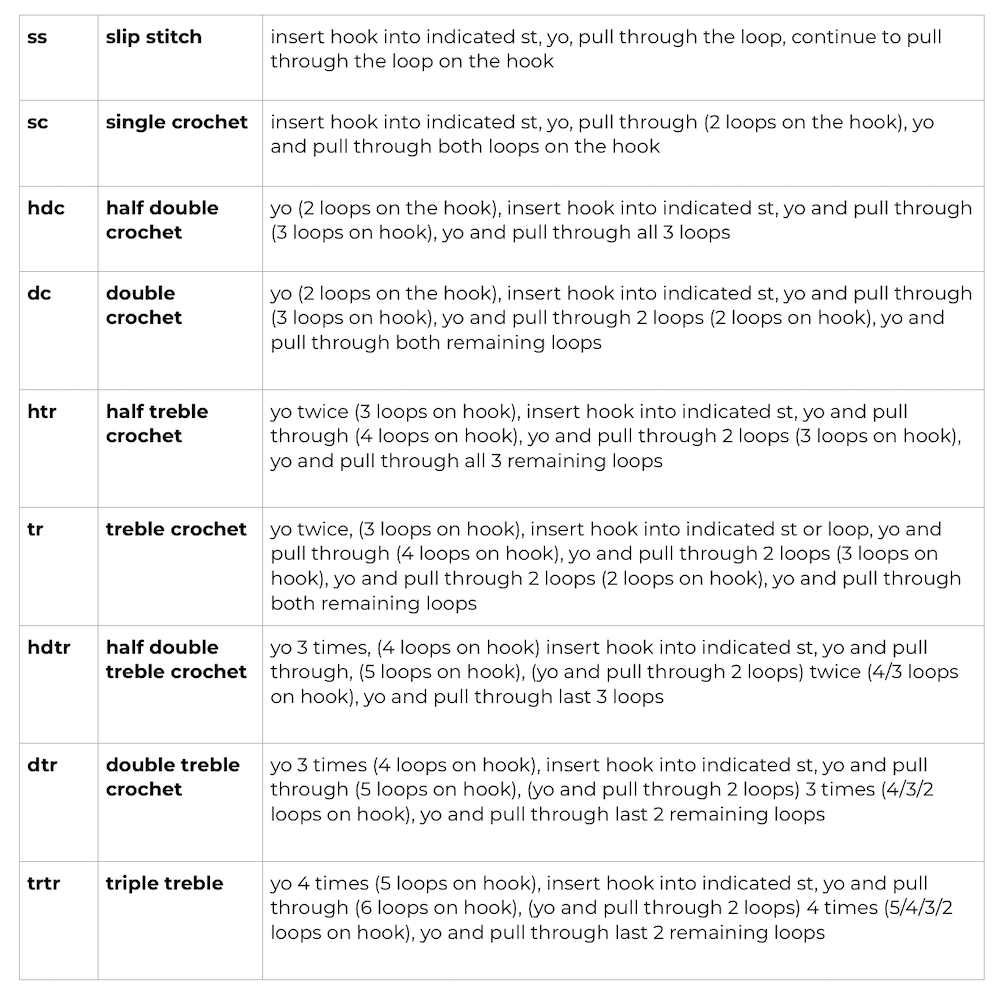
Abbreviations (US Terminology) for the Basic Stitches
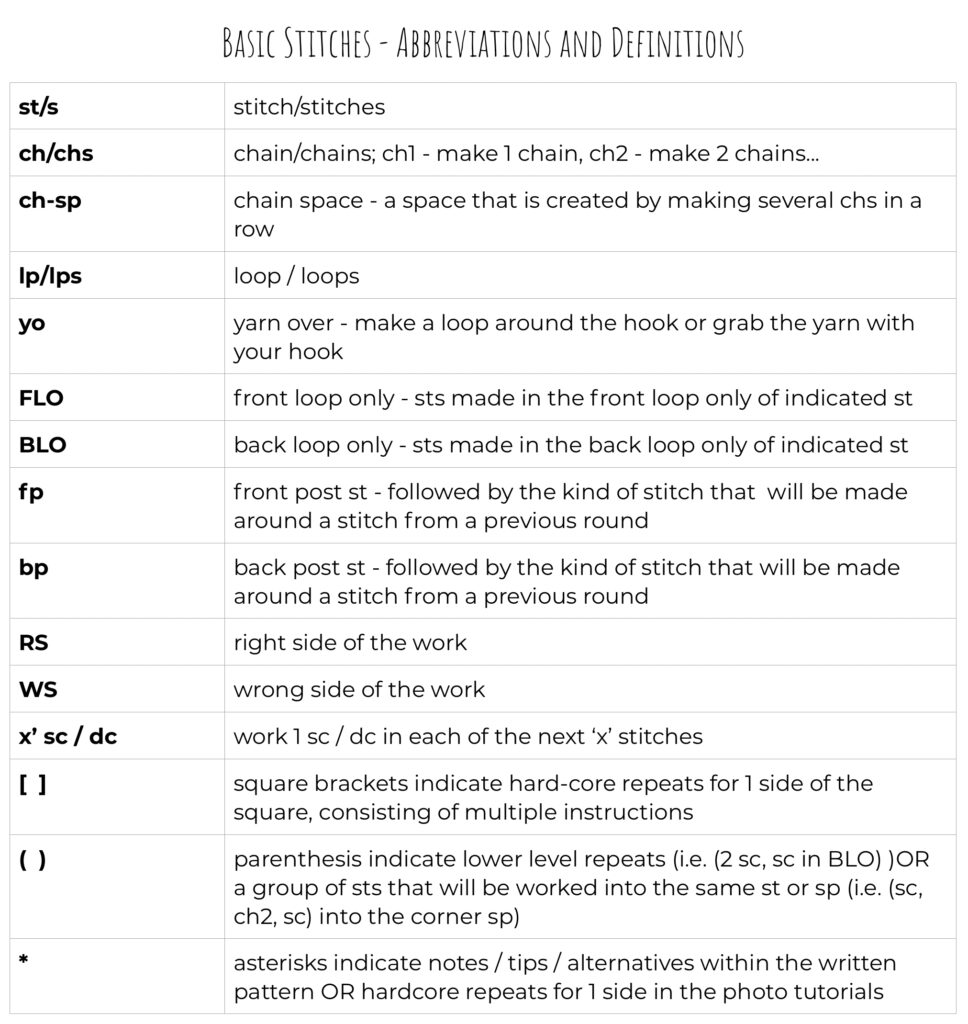
Basic Stitches you should know
For each special stitch you make in front, behind, around or in the front loop of another stitch from a previous round, you must leave the stitch behind or in front of the special stitch unworked (skip 1 stitch) unless instructed otherwise.
The ch1 at the beginning of the round does not count as a stitch and will be skipped when we slip stitch into the first sc at the end of each round.
Keep the slip stitch that closes the round loose as it will replace the sc below as the last stitch of the next round.
The use of stitch markers* is optional and mainly intended to encourage and support less experienced crocheters. If finding free front loops is easy for you, you are likely to be quicker by crocheting without stitch markers.
‘Optional’ stitch marker* placements are suggested for the adventurous beginner and may not be necessary for intermediate and advanced crocheters.
‘Suggested’ stitch marker* placements are considered beneficial or essential for correct and easy stitch placement for all crochet levels.
If you follow the suggested stitch marker* placements, take the st markers out of the stitch or front loop after the special stitches have been worked, unless instructed otherwise.
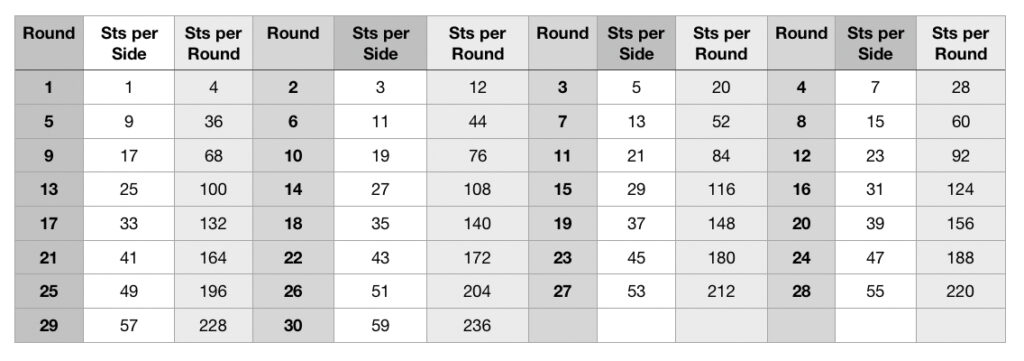
Stitch Count
Each square in this collection consists of 20 rounds, respectively 30 rounds if you choose to work the optional square border. Each side of the square is increased by 2 stitches per round, which means each round has 8 more stitches than the previous one (2 stitches x 4 corners).
The big Claire Square (Season 2) is an exception in terms of size but not stitch count. She is the same size as 4 normal squares, is made in 60 rounds and does not have an extra border.
The stitch count for each side is always odd.
Size
The size of your finished project will depend on your choice of yarn. I have used three different types of yarn as specified below, which gives me a variety of not only size, but also different looks and feels.
Standard squares without the optional border are:
DROPS Baby Merino: 15.5cm x 15.5cm / 6 1/8″ x 6 1/8″
Vera Moda – Florentine Collection – Selce: 19cm x 19cm / 7.5″ x 7.5″
Lincraft Cotton 8ply: 21cm x 21 cm / 8 1/4″ x 8 1/4″
DROPS Paris: 25cm x 25cm / 10″ x 10″
Standard squares including the border are:
DROPS Baby Merino: 24.5 x 24.5cm / 6 1/2″ x 6 1/2″
Lincraft Cotton 8ply: 29cm x 29cm / 8″ x 8″
DROPS Paris: 37cm x 37cm / 14 1/2″ x 14 1/2″
Materials
Test and Design Square Yarn


I used yarn from the Vera Moda Florentine Collection in Selce, which is a composition of 49% Wool, 48% Acrylic and 3% Nylon for the initial testing.
The yarn manufacturer recommends a 4.0mm(US F(5)-G(6)/UK 8/Japan 7/0) hook, but because I am a bit on the loose side when it comes to crocheting, I used a 3.5mm (US E(4)/UK 9/Japan 6/0) crochet hook. This usually gives me approximately the same size as if using the recommended hook size.
Gauge is 24 sts x 32 rows for 10cm x 10cm
The main part of the squares is 18.5 x 18.5cm / 7 1/4″ x 7 1/4″ if made from this yarn. I did not crochet borders around the test squares.
Show and Tell Squares Yarn
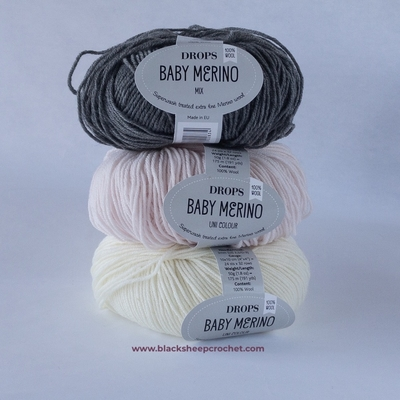

The Show and Tell squares were made in DROPS Baby Merino, which is 100% wool and sooo supersoft!
Even though a 3mm (US C(2)-D(3)/UK 11/Japan 5/0) hook is recommended, I also used the 3.5mm hook. This gave me soft, fluffy, squishy and beautiful squares with great definition.
Gauge is 24sts x 32 rows for 10cm x 10cm (4′ x 4″)
Sizes for this yarn are:
Main inside part only: 16.5 x 16.5cm / 6 1/2″ x 6 1/2″
Including the border: 24.5 x 24.5cm / 9 1/2″ x 9 1/2″
I got my Drops Baby Merino from Wool Warehouse and they have agreed to provide yarn kits in the most beautiful colourways.
Pictures and Tutorials
Finally, for the “how to…” photo tutorials I used a simple Cotton 8ply yarn in cream from Lincraft (an Australian craft store), which gives me a fantastic stitch definition with a 3.5mm(US E(4)-G(6)/UK 9/Japan 6/0).
Label information:
Gauge is 22 sts x 30 rows for 10cm x 10cm (4″ x 4″)
Needle and hook: 4mm
Meterage: 100m per 50g
I sometimes use this yarn in the video tutorials too, alternating with Flinders Cotton 8ply from Spotlight (also an Australian craft store). The yarn is super soft and the drape is divine, using the same hook as above.
Label information:
Gauge is 21 sts x 29 rows for 10cm x 10cm (4″ x 4″)
Needle and hook: 4mm
Meterage: 115m per 50g
My crochet tension is rather on the loose side, so I usually use a smaller hook than suggested.
Drops Paris is one of my favourite cotton yarns. Some people find it splits easily and I have observed that indeed some batches seem to split more than others. I never had a real problem with that though and I love the extreme colour choice this yarn provides. I use a 4.5mm (US g(6-7)/UK 7/Japan 8/0) hook (recommended 5mm – US H(8)/UK 6/Japan 8/0) to triple test the pattern before it goes out to the editors.
The squares made from this yarn will be used for a square blanket in the “storyteller” colourway.
Label information:
Gauge is 17 sts x 22 rows for 10cm x 10cm (4″ x 4″)
Needle and hook: 5mm (US8/H-8)
Meterage: 75m per 50g
Square size
The inside part is huge: 24.5 x 24.5cm / 9 1/2″ x 9 1/2″
The square including the border is 37 x 37cm / 14 1/2″ x 14 1/2″
This would be the perfect size for a small cushion. Add a row of single crochet or two, sew two squares together and fit a 40cm / 15″ cushion – perfect.
I got my DROPS Paris from Wool Warehouse, who also provide yarn kits in both Drops Baby Merino, Drops Paris and soon Stylecraft Special DK!


Of course you can use any yarn or colour you fancy. This is just what I used and since gauge is not super essential, feel free to use your favourite yarn.
Yardage
A table with the yardage for each of the squares in three different yarns is available here.
Here is the yardage for the following yarns:
DROPS Baby Merino (Sock/Fingering/4ply, 50g = 175m / 191 yds):
Gauge: 24sts x 32 rows for 10 x 10cm / 4 x 4″
254g (890m) for the first 12 squares without the border
(Between 21 and 26g per square – exact listing will follow)
35g (123m) for the border of each square
DROPS Baby Merino Yarn Kits are available from Wool Warehouse here
Florentine Collection (50g = 185m / 202 yds):
Gauge: 24sts x 32 rows for 10 x 10cm / 4 x 4″
270g (540m) for the first 12 squares without the border
(Between 23 and 26g per square – exact listing to follow)
I have not made any borders around these test squares, because I will try a blanket option without them.
Lincraft Cotton 8ply (50g = 100m / 109 yds):
22sts x 30 rows for 10 x 10cm / 4 x 4″
540g (1080m) for the first 12 squares without the border
(Between 45 and 49g per square – exact listing to follow)
78g (156m) for the border of each square
DROPS Paris (50g = 75m / 82 yds):
17 sts x 22 rows for 10 x 10cm / 4 x 4″
888g (1260m) for the first 12 squares without the border
(Between 70 and 76g per square – exact listing to follow)
121g (182m) for the border of each square
DROPS Paris Yarn Kits are available from Wool Warehouse here
As always, if your tension is different to mine, your yardage may vary. Make sure you err on the plus side. You might want some extra yarn left over for an optional border around the finished project.
Yarn Kits
Please refer to Wrapped In Jamie CAL Yarn Kits for information about ordering your yarn.
Miscellaneous
Written Tutorials: Each new part of the Wrapped in Jaime CAL will be available indefinitely on this website once released. There will be lots of pictures and step-by-step instructions to explain critical points.
Video Tutorials: Accompanying the written instructions, video tutorials for each of the patterns will be available. Like the pictures and the written instructions, they are intended to explain the bits that might be tricky for a beginner and need to be used in conjunction with the written pattern.
Prints: Patterns in US terminology will be available as PDF prints for convenient off-line use for a small contribution. It is not a requirement to download the ad-free versions as all the patterns are and will be displayed on the website for free, although they may make your life easier.
Languages: We are aiming to have this pattern translated into as many languages as we can. If you are experienced and would like to contribute to this project in the way of helping with translations, please send an email to admin at blacksheepcrochet dot com.
No pattern or part thereof may be translated without the designer’s permission.
Notification: If you would like to be notified with updates about this CAL and other new activities, please subscribe to my newsletter here or through any contact form on the blog.
If you don’t find any yarn that you like at the Wool Warehouse, there is also Deramores who ship internationally.
UPDATE: In support of a fantastic Australian yarn store, I must simply tell you about the wonderful yarn available from Bendigo Woollen Mills. Their big 200g balls are perfect for a project like this. You will be surprised about their great quality.
Start date
The CAL started September 1st, 2019.
The first six squares have already been released and you can find the links to them here:
Wrapped In Jamie CAL Season 1 Squares
However, the new team I work with has encouraged a change in my way of describing stitch placement, which makes more sense and is easier to read and translate. You can find an explanation of it here:
“Petranese” – a new way of describing overlay stitch placement
We are currently updating the patterns written in OLD Petranese to NEW Petranese. If you purchased a pattern previously, you will automatically receive a link to the updated pattern as soon as it is re-released.
The patterns themselves did not change, only the way they are written. You are still able to use the patterns written in OLD Petranese.

thank You's
I would like to express a big THANK YOU to the following people:
Polly Plum from Every Trick on the Hook for sharing her advice so freely and generously when I approached her. Polly’s Stardust Melodies CAL was one of the most enjoyable CALs I participated in and the blanket I made with the squares from this CAL has won me 1st prize at the local country show.
It was your CAL that made me fall in love with squares again and your designs highly influenced mine. Thank you, Polly.
Dedri Uys from Look at What I Made for her infamous Sophie’s Universe CAL. It was this project that not only reminded me of my love of crochet, but also allowed me to gently upgrade my skills while for once finishing a project after a few year break and your standard of pattern description is my aim. Thank you, Dedri.
Tatsiana from Lilla Björn Crochet for her great overlay crochet patterns, which are always a joyful challenge. Your designs are always cute and playful, yet the perfect amount of challenge to make them special.
It was your Spirits of Life Wrap CAL that inspired me to venture out on my own design adventure. Thank you, Tatsiana.
Marinke Slump from A Creative Being, who sadly has moved on to the other side. Her mandalas were the first projects that showed me that crochet can be quirky and fun. It all continued from there. You will never be forgotten.
Affiliate links are marked with an asterix (*).