WIJ Season 1 Project Border Pattern

This post contains affiliate links in form of text links – marked with an asterisk (*) in purple – and banners, all from carefully selected craft suppliers.

When you purchase something through one of the links, I earn a tiny commission – no extra cost to you. Every bit means support towards the expenses of website hosting, email service, secure gateways and all the other tools and apps required to bring these patterns to you. Win-win, right?

Outlanding Stitch Compendium

‘Petranese’ is the Black Sheep Crochet way of writing overlay crochet patterns. 

If you are not yet familiar with this system, you can download your free copy of the Outlanding Stitch Compendium with explanations, instructions and photo tutorials for some special stitches here:

Alternatively, visit the online version 

Outlanding Stitch Compendium Resource Page

or check out the ‘Petranese’ explained Tutorial series

Background Story and Designer's Thoughts

The Background Story and Designer’s Thoughts to this border can be found here:

Season 1 Project Border Background Story

Introduction and FAQ

Please refer to the Pattern Introduction and FAQ page for general information about

-Skill Level
-Gauge
-Recommended Yarn and Yardage
-Yarn Kit Colour Suggestions
-12 Square Layout Samples for Jamie, Claire and Scotland colourway in solid colours and 
-Terminology

Wool WarehouseWool Warehouse

Terminology Used

This pattern uses US terminology  throughout. 

Abbreviations and the most basic stitches are explained in the ‘Petranese’ explained tutorials

Video Tutorials

You can find all video tutorials for this and other released squares in my YouTube Channel for Black Sheep Crochet, where you can also subscribe for automatic notification when new videos are uploaded.

All videos are  in “Germanised British English US crochet terms Petranese”.

NO VIDEO TUTORIAL MAY BE CREATED FROM THIS PATTERN – IN ANY LANGUAGE – WITHOUT THE DESIGNER’S WRITTEN PERMISSION!

WIJ Season 1 Project Border Right-Handed

WIJ Season 1 Project Border Left-Handed

PDF Download

Your resources for this pattern are
a free written pattern page (this one)
– including finished round pictures and
picture tutorial for tricky stitches
a free video tutorial (right-handed and left-handed version)
– pattern support in our dedicated Facebook and Ravelry groups

There is no obligation to download the PDF version of this pattern. If you are a bit tech savvy or know someone who is, you can make a PDF from the website.

However, if you like the pattern and want to support my design work or appreciate the pattern without ads to take along with you, there is an option to purchase the ad-free PDF version of this pattern for a small contribution through the shop. 

PDF purchases include the following bonuses:

  • a print-friendly written pattern booklet
  • my very own unofficial, hand ‘written’ design chart
  • Visuals for all rounds with special stitches / repeats or repeats within repeats / complicated rounds
  • Suggestions and photos for stitch marker placement
  • pattern as print-friendly written pattern only AND separate, detailed step-by-step, close-up photo tutorial pattern version

Translations

This patterns is currently only available in Germanised British English US crochet terms Petranese.

There are plans to have it translated into different languages soon.

THIS PATTERN MUST NOT BE TRANSLATED INTO ANOTHER LANGUAGE (EXCEPT FOR YOUR OWN PERSONAL USE) WITHOUT THE DESIGNER’S WRITTEN PERMISSION!

You will also need

  • scissors
  • darning needle to weave in ends
  • stitch markers* (optional; this could even be a yarn scrap, a hair pin or a paperclip)

Basic Stitches

You should be familiar with slip stitch (​ss)​, single crochet (s​c​), front post single crochet (fpsc), half double crochet (hdc​), double crochet(dc),double treble (dtr), popcorn st, back loop only (BLO)​ , front loop only (​FLO)​ and 3​ rd loop​ stitches.

All basic stitches, abbreviations and instructions on how to read the special stitches are explained on the website https://blacksheepcrochet.com/outlanding-stitch-compendium-tutorials/

and in the PDF Outlanding Stitch Compendium w​hich you can download for free via the cart in the shop
https://blacksheepcrochet.com/product-category/outlander-collection​/

or watch the “‘Petranese’ explained’​” tutorials https://blacksheepcrochet.com/petranese-explained-describing-overlay-crochet-stitch-placement/

Joining Squares

A list of joining ideas can be found here: https://blacksheepcrochet.com/wij-cal-joining-your-squares/

I recommend the Zig-Zag Slip Stitch Join, 3rd-loop slip stitch join or flat ‘Zipper’ join.

Photo Tutorial Website:
https://blacksheepcrochet.com/zig-zag-slip-stitch-join/

Video Tutorial RH https://youtu.be/2Fbgf52mgms

Video Tutorial LH https://youtu.be/8mErqU6AtYM

Reminder and Important Pattern Notes

For each special stitch you make in front, behind, around or in the front loop of another stitch from a previous round, you must leave the stitch behind or in front of the special stitch unworked (skip 1 stitch) unless instructed otherwise. 

The ch1 at the beginning of the round does not count as a stitch and will be skipped when we slip stitch into the first sc at the end of each round.

Keep the slip stitch that closes the round loose as it will replace the sc below as the last stitch of the next round.

The use of stitch markers* is optional and mainly intended to encourage and support less experienced crocheters. If finding free front loops is easy for you, you are likely to be quicker by crocheting without stitch markers.

Optionalstitch marker* placements are suggested for the adventurous beginner and may not be necessary for intermediate and advanced crocheters.

Suggestedstitch marker* placements are considered beneficial or essential for correct and easy stitch placement for all crochet levels.

If you follow the suggested stitch marker* placements, take the st markers out of the stitch or front loop after the special stitches have been worked, unless instructed otherwise.

Wool Warehouse

Counting Stitches

In order to ensure correct stitch placement and that the border fits perfectly, counting stitches is very important. To make this task easier, it is recommended to use stitch markers at significant places, for example in each transitioning stitch and in the middle stitch of the first round (this is the 30th stitch after the corner in Round 1-Part 1, respectively the 30th stitch after the transitioning stitch in Round 1-Parts 2 and 3). 

Other significant placements for the stitch marker with shorter stitch count landmarks are the 21st and the 45th st after the corner/transitioning stitch in Round 1. Remember to include these when counting. The final stitch count for the round always includes the corner sc of Part 1 and Part 3. 

Season 1 Project Border Specifics

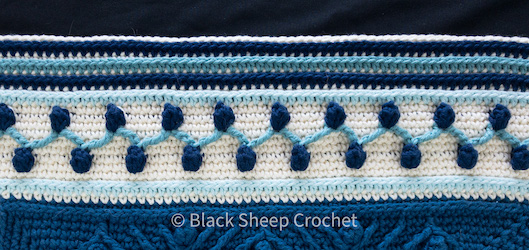
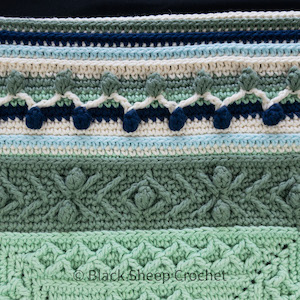
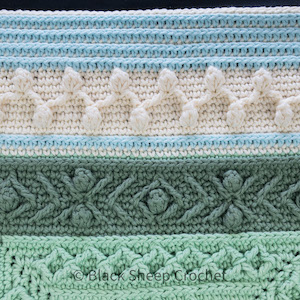
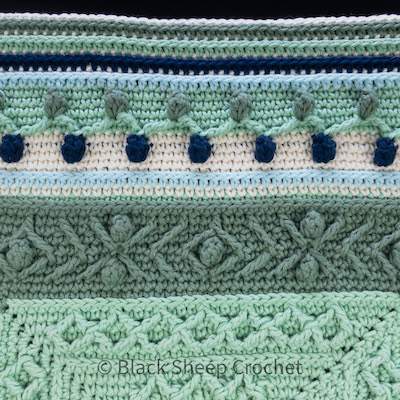
This border pattern is suitable for projects with a count of 59 stitches in the last round and where the squares are connected with a slim join. It does not work for joins that increase the stitch count by more than one stitch between squares.

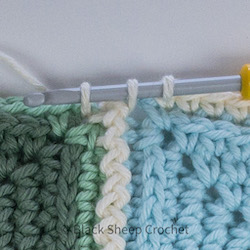
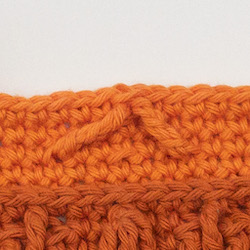
The stitch that is made above the join is called the ‘transitioning stitch’. This stitch marks the first st of the next part.

The pattern instructions are separated in three parts for each round:

Part 1: The starting corner square – the corner square in which you start the new round (with a (sc, ch2, sc) into the ch2 corner space) up until the last stitch before the ‘transitioning stitch’. It starts with the second chain, respectively the stitch count starts with the second sc worked into the ch2 corner space.

This part increases by 1 st per round, starting from 60 stitches in Round 1.

Part 2: The middle square(s) – the square(s) that join to another square on each side (left and right) with a slim join that adds only 1 extra stitch. It starts at the transitioning stitch above the join and finishes at the last stitch before the next transitioning stitch.

This part does not increase in stitch count and stays at 60 stitches throughout each round.

Part 3: The finishing corner square – the last square on this side, starting with the transitioning stitch and ending with a sc and ch1 (= half of the (sc, ch2, sc) that is made) in the ch2 corner space.

This part starts with 61 stitches in Round 1 and increases by 1 stitch in each round. 

Stitch Count (in Round 1 / Foundation Round):

Your final stitch count per side will be:

1 x st count part 1 + n x st count part 2 + 1 x st count part 3, 

where n = the number of middle squares.

Stitch Count for Round 1 with 3 squares on 1 side:

1 x 60 sts (part 1) + 1 x 60 sts (part 2 + 1 x 61 sts (part 3) = 181 sts on this side

Stitch Count for Round 1 with 4 squares on 1 side:

1 x 60 sts (part 2) + 2 x 60 sts (2 x part 2) + 1 x 61 sts (part 3) = 241 sts on this side

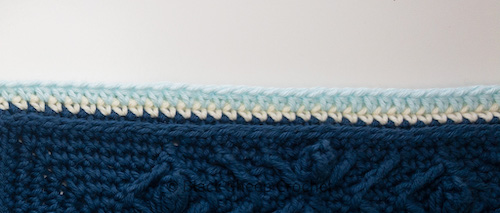
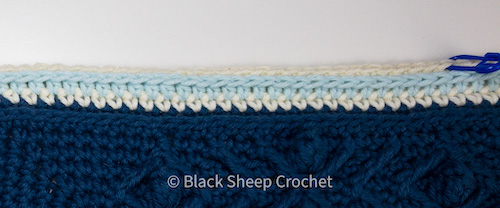
Starting Rounds With or Without Colour Change:

If you change colours between rounds, you may want to consider finishing the previous round with an invisible join and starting the new round with a standing sc. 

In case you continue with the same colour, begin each round with a ch1 before working the (sc, ch2, sc) into the ch2 corner space. 

Choose your preferred method for each round or follow the suggestions.

Specials Stitches used in this pattern

Special stitches relevant for this pattern are outlined below and specified in more detail above each round.

Skip 1 st behind (dcbb: in front of) each special stitch (unless instructed otherwise), continue in the next st.

dl-sc / sc decdouble-legged single crochet / single crochet decrease – a single crochet with two legs that is worked like a single crochet decrease – insert hook in first stitch / corner, yo, and pull through, insert hook in second stitch / corner, yo and pull through, yo and pull through all three loops on the hook

fpsc front post single crochet – single crochet around the next st

dcbbdouble crochet into the st behind and (2 rounds) below the next st 

fphdc –  front post half double crochet  – half double crochet around the next st

4dc popcorn (popcorn 0-2 in FLO)popcorn st with 4 double crochet in front loop only of the st 2 rounds below the next st

4dc popcorn-x (popcorn 0-2 in FLO-x)popcorn st variation with 4 double crochet in front loop only AND the horizontal loop below the front loop that connects the 2 legs of the dtr-2tog that is 2 rounds below the next st

dtr_+3-3 in FLOdouble treble  in front loop only of the st 3 ahead and 3 rounds below the next st

dtr_-3-3 in FLOdouble treble  in front loop only of the st 3 behind and 3 rounds below the next st

dtr-2tog – dtr_-3-3 in FLO/dtr_+3-3 in FLO/<2tog2 stitches together with first leg a double treble  in front loop only of the st 3 behind and 3 rounds below the next st and second leg a double treble  in front loop only of the st 3 ahead and 3 rounds below the next st

Knit Picks Banner

Colour Guidance

Colour guidance (CG) is provided for working the border in 3 colours 

(CG3) where 

Colour A = Cream, colour B = Light Blue and colour C = Dark Blue OR

s a 4 coloured version(CG4) where

Colour A = Cream, colour B = Light Blue, colour C = Dark Blue and colour D = Medium Blue

(see below)

20 – Cream
19 – Dark Blue
18 – Cream
17 – Light Blue
16 – Cream
15 – Dark Blue
14 – Cream
13 – Light Blue
12 – Cream
11 – Cream and Dark Blue

10 – Cream 
09 – Cream and Light Blue
08 – Cream
07 – Cream
06 – Cream and Dark Blue
05 – Cream
04 – Cream
03 – Cream
02 – Light Blue
01 – Cream

20 – Cream
19 – Dark Blue
18 – Cream
17 – Medium Blue
16 – Cream
15 – Dark Blue
14 – Cream
13 – Light Blue
12 – Cream
11 – Cream and Dark Blue

10 – Cream 
09 – Cream and Medium Blue
08 – Cream
07 – Cream
06 – Cream and Dark Blue
05 – Cream
04 – Cream
03 – Cream
02 – Light Blue
01 – Cream

LoveCrafts

Colour Combination Samples

Below are a few additional samples of how the border could look like, using  contrasting colours, working with one colour only, working complete rounds (6, 9 and 11) with 1 contrasting colour only instead of  switching between 2 colours within the same round…

Rounds 6 & 7 (dark Blue) and 11 & 12 (dark Green) worked with 1 colour only, light Green for Rounds 8 to 10 with Round 9  switching to Cream for the dtrs

Only hdc rounds worked in contrast colours, Rounds 3 to 12 worked in 1 colour only

Popcorn rounds (6 and 11) worked switching between 2 colours, Round 9 (dtr-round) worked in 1 colour only

Rounds 6 & 7 and 11 & 12 worked in the same colour (only dark Blue), Rounds 8 to 10 worked in a light Blue with colour 9 switching to Cream for the dtrs 

Pattern

Please make sure to find the first stitch, as it may sometimes be hidden by the second sc of the corner (sc, ch2, sc)

Special Stitch in Round 1:

  • dl-sc / sc decdouble-legged single crochet / single crochet decrease – a single crochet with two legs that is worked like a single crochet decrease – insert hook in first stitch / corner, yo, and pull through, insert hook in second stitch / corner, yo and pull through, yo and pull through all three loops on the hook

    This is the transitioning stitch above the join that connects the second corner of the previous square with the first corner of the next square – no st will be skipped behind this special st

Round 1: Colour A 

Attach your yarn (A) and ch1 OR start with a standing st

[(sc, ch2, sc) into the ch2 starting corner, 

Part 1: 59 sc

Part 2: dl-sc / sc dec , 59 sc (repeat for each ‘middle’ square if you have more than one)

Part 3: dl-sc / sc dec , 59 sc] 4 times.

Finish the round with an invisible join on the 4th side. 

Stitch Count (always includes the corner sc in Parts 1 and 3):  

Part 1: 60 sts Part 2: 60 sts Part 3: 61 sts

If you use stitch markers, move them up to the next round each time you pass one. 

Round 2: Colour B

Attach your yarn (B) and ch1 OR start with a standing st 

[(sc, ch2, sc) into the ch2 corner space, hdc across all parts] 4 times

Finish the round with an invisible join on the 4th side. 

Stitch Count:  

Part 1: 61 sts Part 2: 60 sts Part 3: 62 sts 

Round 3: Colour A

Attach your yarn (A) and ch1 OR start with a standing st

[(sc, ch2, sc) into the ch2 corner space,

Part 1: 61 sc in 3rd loop

Part 2: 60 sc in 3rd loop (repeat for each ‘middle’ square if you have more than one)

Part 3: 62 sc in 3rd loop] 4 times

Sl st into the first sc of the starting corner.

Stitch Count:  

Part 1: 62 sts Part 2: 60 sts   Part 3: 63 sts 

Wool Warehouse Wool Warehouse

Round 4: Colour A

Ch1, [(sc, ch2, sc) into the ch2 corner space, sc across all parts] 4 times

Sl st into the first sc of the starting corner.

Stitch Count:  

Part 1: 63 sts  Part 2: 60 sts Part 3: 64 sts

Round 5: Colour A

Ch1, [(sc, ch2, sc) into the ch2 corner space,

Part 1: (sc in BLO, 5 sc) 11 times, (The 11th repeat will cross from Part 1 to Part 2. 

Checkpoint: the 3rd of 5 sc of the 11th repeat will fall into the transitioning st of Part 2)

Part 2: (sc in BLO, 5 sc) 10 times, (The 10th repeat will cross from Part 2 to Part 3. 

Checkpoint: the 3rd of 5 sc of the 10th repeat will fall into the transitioning st of Part 3)

(repeat for each ‘middle’ square if you have more than one)

Part 3: (sc in BLO, 5 sc) 10 times, sc in BLO] 4 times

Sl st into the first sc of the starting corner.

Stitch Count:  

Part 1: 64 sts Part 2: 60 sts Part 3: 65 sts

myBluprint.com

Note: Rounds 6, 9 and 11 will / could be worked with 2 colours

Colour changes always happen on the final ‘yo and pull through’ of the stitch before the one that is supposed to be made in the alternative colour. A colour change (cc) is indicated before the st that will be made in the other colour. 

When working with two colours, you hold the current colour you work with like you normally do to keep the tension and leave the other colour in the back, working over it as you go. Keep it loose to avoid creating too much tension in the back. Depending on how you hold your yarn, maybe you can use the little or another finger to guide the yarn in the background. 

You can see an example of how to work with two colours in this round in the video to this pattern.

Step-by-step example: Round 6 starts with 1 sc in colour A followed by a popcorn st in colour C, so 

1 – you start the first sc with colour A,  (sc, cc)

2 – then close it with colour C on the last yo, 

3 – continue to work the popcorn st until you pull the loop of the last dc through the top of the first dc,  (popcorn, cc)

4 – then change back to colour A and close the popcorn with a ch1 in colour A,

5 – continue with colour A for the sc until the last, repeat from (2)

Special Stitch in Round 6:

  • 4dc-popcorn (pop st 0-2 in FLO)popcorn st with 4 double crochet in front loop only of the st 2 rounds below the next st

Skip 1 st behind the popcorn st

Round 6: Colours A & C

Work the sc in colour A and the popcorn st in colour C

Ch1, [(sc, ch2, sc) into the ch2 corner space,

Part 1: sc, cc, (popcorn, cc, 5 sc, cc) 11 times, (The 11th repeat will cross from Part 1 to Part 2. 

Checkpoint: the 3rd of 5 sc of the 11th repeat will fall into the transitioning st of Part 2)

Part 2: (popcorn, cc, 5 sc, cc) 10 times, (The 10th repeat will cross from Part 2 to Part 3. 

Checkpoint: the 3rd of 5 sc of the 10th repeat will fall into the transitioning st of Part 3)

(repeat for each ‘middle’ square if you have more than one)

Part 3: (popcorn, cc, 5 sc, cc) 10 times, popcorn, cc, sc] 4 times


Sl st into the first sc of the starting corner in colour A, cut yarn in colour C.


Stitch Count:  

Part 1: 65 sts (11 popcorn, 54 sc)  Part 2: 60 sts (10 popcorn, 50 sc)  

Part 3: 66 sts (11 popcorn, 55 sc)


Special Stitch in Round 7:

  • dcbbdouble crochet into the st behind and (2 rounds) below the next st

Skip 1 st in front of the dcbb

Round 7: Colour A

Ch1, [(sc, ch2, sc) into the ch2 corner space,

Part 1: 2 sc, (dcbb, 5 sc) 11 times, (The 11th repeat will cross from Part 1 to Part 2. 

Checkpoint: the 3rd of 5 sc of the 11th repeat will fall into the transitioning st of Part 2)

Part 2: (dcbb, 5 sc) 10 times, (The 10th repeat will cross from Part 2 to Part 3. 

Checkpoint: the 3rd of 5 sc of the 10th repeat will fall into the transitioning st of Part 3)

(repeat for each ‘middle’ square if you have more than one)

Part 3: (dcbb, 5 sc) 10 times, dcbb, 2 sc] 4 times

Sl st into the first sc of the starting corner. 

Stitch Count:  

Part 1: 66 sts Part 2: 60 sts Part 3: 67 sts

Knit Picks Banner

Round 8: Colour A 

Ch1, [(sc, ch2, sc) into the ch2 corner space, sc across all parts] 4 times

Sl st into the first sc of the starting corner. 

Stitch Count:  

Part 1: 67 sts Part 2: 60 sts Part 3: 68 sts

Special Stitches in Round 9:

  • dtr_+3-3 in FLOdouble treble  in front loop only of the st 3 ahead and 3 rounds below the next st
  • dtr_-3-3 in FLOdouble treble  in front loop only of the st 3 behind and 3 rounds below the next st
  • dtr-2tog – dtr_-3-3 in FLO/dtr_+3-3 in FLO/<2tog2 stitches together with first leg a double treble  in front loop only of the st 3 behind and 3 rounds below the next st and second leg a double treble  in front loop only of the st 3 ahead and 3 rounds below the next st

Skip 1 st behind each special stitch

Round 9: Colours A & B (CG3) or A & D (CG4)

Work the sc in colour A and the dtr-2tog in colour B / D 

(dtr-2tog tutorial above shows different colours)

Ch1, [(sc, ch2, sc) into the ch2 corner space,

Part 1: 1 sc, cc, dtr_+3-2 in FLO, cc, 5 sc, cc, (dtr-2tog, cc, 5 sc, cc) 10 times

Part 2: (dtr-2tog, cc, 5 sc, cc) 10 times  (the first dtr falls directly in the transitioning st)

(repeat for each ‘middle’ square if you have more than one)

Part 3: (dtr-2tog, cc, 5 sc, cc) 11 times, dtr_-3-3 in FLO, cc, sc] 4 times

Ss into the first sc of the starting corner with colour A. Cut yarn in colour B / D.  

Stitch Count:  

Part 1: 68 sts Part 2: 60 sts Part 3: 69 sts

Wool Warehouse Wool Warehouse

Special Stitches in Round 10:

  • dcbbdouble crochet into the st behind and (2 rounds) below the next st

Skip 1 st in front of each dcbb

Round 10: Colour A 

Ch1, [(sc, ch2, sc) into the ch2 corner space,

Part 1: 2 sc, (dcbb, 5 sc) 11 times,

Part 2: (dcbb, 5 sc) 10 times(the first dcbb falls directly in the transitioning st)

(repeat for each ‘middle’ square if you have more than one)

Part 3: (dcbb, 5 sc) 11 times, dcbb, 2 sc] 4 times

Sl st into the first sc of the starting corner.

Stitch Count:  

Part 1: 69 sts Part 2: 60 sts Part 3: 70 sts

Wool Warehouse

Get the ad-free version of this pattern here:

Special Stitch in Round 11:

  • 4dc popcorn-x (popcorn 0-2 in FLO-x)popcorn st variation with 4 double crochet in front loop only AND the horizontal loop below the front loop that connects the 2 legs of the dtr-2tog that is 2 rounds below the next st

Skip 1 st behind the popcorn st

Round 11: Colours A & C 

Work the sc in colour A and the popcorn st in colour C

Ch1, [(sc, ch2, sc) into the ch2 corner space,

Part 1: 3 sc, cc, (popcorn-x, cc, 5 sc, cc) 11 times,

Part 2: (popcorn-x, cc, 5 sc, cc) 10 times(the first popcorn-x falls directly in the transitioning st)(repeat for each ‘middle’ square if you have more than one)

Part 3: (popcorn-x, cc, 5 sc, cc) 11 times, popcorn-x, 3 sc] 4 times

Ss into the first sc of the starting corner with colour A. Cut yarn in colour C.

Stitch Count:  

Part 1: 70 sts Part 2: 60 sts Part 3: 71 sts

Watch woodworking classes at myBluprint.com

Special Stitch in Round 12:

  • fpsc front post single crochet – single crochet around the next st

Round 12: Colour A 

Ch1, [(sc, ch2, sc) into the ch2 corner space,

Part 1: 4 sc, (fpsc, 5 sc) 11 times,

Part 2: (fpsc, 5 sc) 10 times, (repeat for each ‘middle’ square if you have more than one)

Part 3: (fpsc, 5 sc) 11 times, fpsc, 4 sc] 4 times

Finish the round with an invisible join on the 4th side.

Stitch Count: 

Part 1: 71 sts Part 2: 60 sts Part 3: 72 sts

myBluprint.com

Round 13: Colour B 

Attach your yarn (B) and ch1 OR start with a standing st

[(sc, ch2, sc) into the ch2 corner space, hdc across all parts] 4 times

Finish the round with an invisible join on the 4th side. 

Stitch Count: 

Part 1: 72 sts Part 2: 60 sts Part 3: 73 sts

If you enjoy this pattern, please tell your friends about it on Ravelry, Facebook or Instagram. Let them – and me! – see your finished square with hashtag #black_sheep_crochet, #wrappedinjamie, #wrappedinjamiecal or #square10

For pattern support, you can join our Facebook Group
This group is incredibly supportive and we have a lot of fun there. You will be able to interact with me there and if you have a question, it will probably be answered before I even see it by one of our awesome Wrapped in Jamie Clan members. 
 
For posts that are Outlander but not Wrapped in Jamie CAL related, join our 
Community Chatter facebook group

If you are not a facebook fan, join the Ravelry group. I am still learning how to create groups and put the patterns up there. Bear with me!
https://www.ravelry.com/groups/wrapped-in-jamie-cal-project-group—black-sheep-crochet/

Not keen on Ravelry either?
Join the Wrapped in Jamie Clan email list for all exclusive WIJ CAL updates. No spam, no salesy emails, -just WIJ!

Check out all subscribe options here:
https://blacksheepcrochet.com/joining-the-flock/

Round 14: Colour A 

Attach your yarn (A) and ch1 OR start with a standing st

[(sc, ch2, sc) into the ch2 corner space, sc in 3rd loop across all parts] 4 times

Finish the round with an invisible join on the 4th side. 

Stitch Count: 

Part 1: 73 sts Part 2: 60 sts Part 3: 74 sts

After finishing Round 14 you will have a border with a distinctive inner part (the popcorns and the dtr-2togs) and ‘framing’ rounds (hdcs, followed by 3rd loop sc) above and below. If you feel that your border is wide enough and you like the symmetry, you could stop here.

To make your border wider and/or maybe repeat some of your other square colours, you can add as many or as few repetitions of Rounds 13 and 14 as you want.  In the featured picture I went up to Round 20.

Shop Darn Good Yarn

Round 15: Colour C 

Attach your yarn (C) and ch1 OR start with a standing st

[(sc, ch2, sc) into the ch2 corner space, hdc across all parts] 4 times

Finish the round with an invisible join on the 4th side. 

Stitch Count: 

Part 1: 74 sts Part 2: 60 sts Part 3: 75 sts

Round 16: Colour A 

Attach your yarn (A) and ch1 OR start with a standing st

[(sc, ch2, sc) into the ch2 corner space, sc in 3rd loop across all parts,] 4 times


Finish the round with an invisible join on the 4th side. 

Stitch Count: 

Part 1: 75 sts Part 2: 60 sts Part 3: 76 sts

Round 17: Colour B (CG3) or D (CG4)

Attach your yarn (B / D) and ch1 OR start with a standing st

[(sc, ch2, sc) into the ch2 corner space, hdc across all parts] 4 times

Finish the round with an invisible join on the 4th side. 

Stitch Count: 

Part 1: 76 sts Part 2: 60 sts Part 3: 77 sts

Round 18: Colour A 

Attach your yarn (A) and ch1 OR start with a standing st

[(sc, ch2, sc) into the ch2 corner space, sc in 3rd loop across all parts] 4 times

Finish the round with an invisible join on the 4th side. 

Stitch Count: 

Part 1: 77 sts Part 2: 60 sts Part 3: 78 sts

Wool Warehouse

Round 19: Colour C

Attach your yarn (C) and ch1 OR start with a standing st

[(sc, ch2, sc) into the ch2 corner space, hdc across all parts] 4 times

Finish the round with an invisible join on the 4th side. 

Stitch Count: 

Part 1: 78 sts Part 2: 60 sts Part 3: 79 sts

Round 20: Colour A 

Attach your yarn (A) and ch1 OR start with a standing st

[(sc, ch2, sc) into the ch2 corner space, sc in 3rd loop across all parts] 4 times

Finish the round with an invisible join on the 4th side. 

Stitch Count: 

Part 1: 79 sts Part 2: 60 sts Part 3: 80 sts

Congratulations!
Your Season 1 Project Border is now finished and so is your blanket!

If you want to take pretty pictures, you can block your square. 

There are different ways to block a square, which I will write about in a different post.

You can go thrifty or luxurious with your blocking tools* or a mixture of both. Either way, your squares will most likely look straighter with an increased stitch definition when they have been blocked. 

Would you like to have your project featured in our Wrapped in Jamie Projects Gallery?

If so, please send me an email with a good quality picture and a note confirming that the work is yours and that I have your permission to use your photo. 

If you want to watermark your photo – which I suggest you do – please use your name (or initials if you prefer) only. In case you have a website, please include it and I will add a link to it.

This post contains affiliate links in form of text links – marked with an asterisk (*) in purple – and banners, all from carefully selected craft suppliers.

When you purchase something through one of the links, I earn a tiny commission – no extra cost to you. Every bit means support towards the expenses of website hosting, email service, secure gateways and all the other tools and apps required to bring these patterns to you. It’s a win-win, right?

I participate in the following programs:

Wool Warehouse*

Knitpicks*

WeCrochet*

Lovecrafts*

Deramores*

Blueprint*

Darn Good Yarn*

Knitcrate

Annie’s* 

MumsHandMade*

Creativebug*

Feel free to share this with your friends on your favourite social media network