

Outlanding Stitch Compendium
Square 7 – The Duel introduced the new “Petranese” – the Black Sheep Crochet way of writing overlay crochet patterns.
Squares 1 – 6 are currently updated from ‘OLD’ to ‘NEW’ Petranese. If you are not yet familiar with the new system or ‘Petranese’ in general, you can download your free copy of the Outlanding Stitch Compendium with explanations, instructions and photo tutorials for some special stitches here:
Alternatively, visit the online version
Skill Level
Wrapped in Jamie squares are designed in overlay crochet technique, which requires an understanding of basic crochet terminology and stitches. Most overlay crochet patterns are therefore by default classified as intermediate or even advanced.
The Outlanding Stitch Compendium, however, has been created with an adventurous beginner in mind. It contains explanations for every aspect that is relevant in order to comprehend the patterns. (see above for download or website options)
Gauge
Gauge is not important for these squares, but using the same yarn and tension for all squares and potentially the square border, big Claire square and triangles is. I recommend to make a small square swatches in your favourite yarn with different hooks to find the tension and drape you prefer. It may be a good idea to make a note of your final choice to keep with your project.
Here are some statistics for yarn I used to make the squares:
Recommended Yarn and Yardage
Drops Baby Merino Fingering/Sock/4ply
Gauge 24 sts x 32 rows with a 3mm/US2.5/D-3/UK 11 hook
175m/50g (191yds/1.75oz)
(available as part of a yarn kit from Wool Warehouse)
Yarn Requirements:
Inner Square: approximately 80m/90yds
Lincraft Homebrand DK/Light Worsted/8ply
Gauge 22 sts x 30 rows with a 4mm/US G/6/UK8 hook
100m/50g ( 110yds/1.75oz)
(sadly, available in Australia only)
Yarn Requirements:
Inner Square: approximately 95m/105yds
Drops Paris Worsted/Aran/10ply
Gauge 17 sts x 22 rows with a 5mm/US-H/8/UK-6 hook
75m/50g (82yds/1.75oz)
(available as part of a yarn kit from Wool Warehouse)
Yarn Requirements:
Inner Square: approximately 113m/124yds
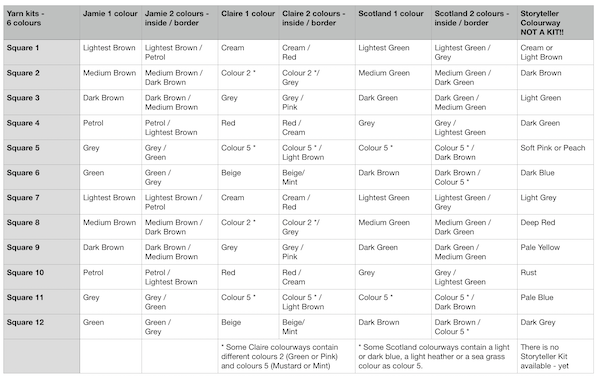
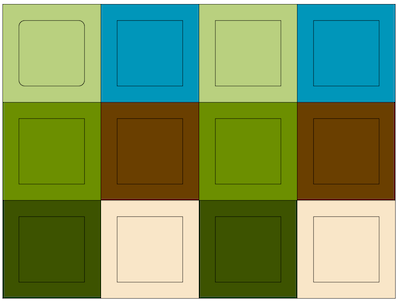
Yarn Kit Colour Suggestions
The chart below offers suggestsions for those who use the yarn kits (or anyone who you wants to use 6 colours)
The yarn kits
- 2 solid coloured squares of each colour
- 2 squares where the inside square is colour A and the border is Colour B for the first square and the second square is vice versa or
- you can mix and match to use each colour twice for an inside square and twice for the border
- vertical sorted by square number always left to right
- vertical sorted by number left to right for row 1, right to left for row 2 and left to right again for round 3 (in a 3 x 4 grid)
- or in a similar fashion as a 4 x 3 grid
- or as a table or bed runner 2 x 6
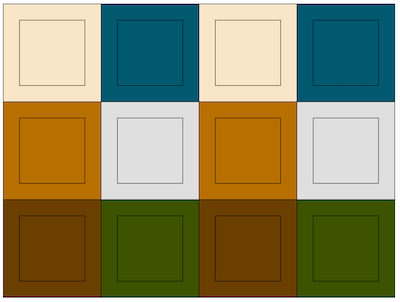
12 Square Layout Samples for Jamie Colourway in Solid Colours
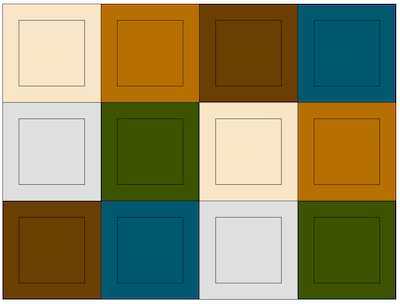
12 Square Layout Sample for Claire Colourway in Solid Colours
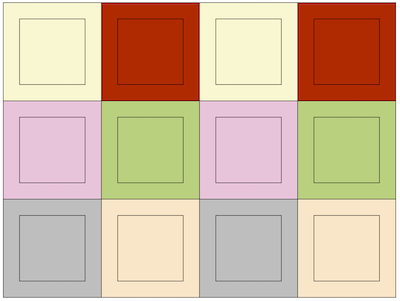
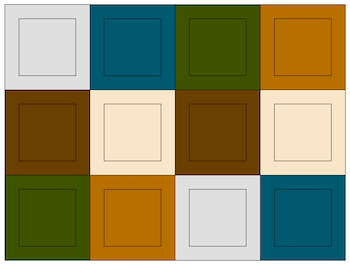
12 Square Layout Sample for Scotland Colourway in Solid Colours
Terminology
In one word: Hilarious.
In three phrases: Petranese. Germanised British English. US crochet terms.
Seriously: US crochet terms
Explained:
– When I started to read English crochet patterns, the first ones were written in US crochet terminology, which to me makes more sense than UK terminology (hence the US crochet terms) – no offence to UK terminology intended.
– I live in Australia, where we speak and write in British English (hence the UK ‘colour’ or ‘favourite’ instead of the US ‘color’ or ‘favorite’ and the like).
– My mother language is German (hence the Germanism including funny phrases, grammar and spelling mistakes)
– I could not find a way of easily describing stitch placements for overlay crochet special stitches, so I ‘invented’ a system. One of my facebook group members called it ‘Petranese‘.
Video Tutorials
You can find all video tutorials for this and other released squares in my YouTube Channel for Black Sheep Crochet, where you can also subscribe for automatic notification when new videos are uploaded.
All videos are also in Germanised British English US crochet terms Petranese.
NO VIDEO TUTORIAL MAY BE CREATED FROM THIS PATTERN – IN ANY LANGUAGE – WITHOUT THE DESIGNER’S WRITTEN PERMISSION!
Direct links to right- and left-handed video tutorials (for the new patterns) are / will be listed below.
Videos are /will be embedded on each respective pattern page.
PDF Downloads
Your resources for the patterns are
– a free written pattern page for each pattern
– including finished round pictures and
– picture tutorials for tricky stitches
– a free video tutorial (right-handed and left-handed version)
– pattern support in our dedicated Facebook and Ravelry groups
There is no obligation to download the PDF version of the patterns. If you are a bit tech savvy or know someone who is, you can make a PDF from the pattern website.
However, if you like the patterns and want to support my design work or appreciate the patterns without ads to take along with you, there is an option to purchase the ad-free PDF version for each pattern for a small contribution through the shop.
https://blacksheepcrochet.com/product-category/wrapped-in-jamie-cal/
PDF purchases include the following bonuses:
- a pattern booklet (5-6 pages for the written pattern only and 40+ pages for the step-by-step photo tutorial)
- a specialised overlay crochet chart that is inspired by and adapted from Polly Plum‘s ingenious chart she used for the Stardust Melodies CAL
- Visuals for all rounds with special stitches / repeats or repeats within repeats / complicated rounds
- Suggestions and photos for stitch marker placement
- pattern as written pattern only AND detailed step-by-step, close-up photo tutorial pattern version
Direct links to the patterns are listed below.
Translations
The patterns are currently only available in “Germanised British English US crochet terms Petranese”.
There are plans to have the patterns translated into different languages once all WIJ patterns for the squares, square border, Claire, triangles and outer borders have been released.
NONE OF THE PATTERNS MUST NOT BE TRANSLATED INTO ANOTHER LANGUAGE (EXCEPT FOR YOUR OWN PERSONAL USE) WITHOUT THE DESIGNER’S WRITTEN PERMISSION!
You will also need
- scissors
- darning needle to weave in ends
- stitch markers in different colours (optional, but highly recommended, this could even be a yarn scrap, a hair pin or a paperclip)
Reminder
Breakdown of angular stitch abbreviations:
Forward angular stitch
tr_
type of st
+2
st(s) ahead
-3
rounds below
treble 2 stitches ahead and 3 rounds below the next stitch = tr_+2-3
Backward angular stitch
tr_
type of st
-2
st(s) behind
-3
rounds below
treble 2 stitches behind and 3 rounds below the next stitch = tr_-2-3
Important Pattern Notes
- For each special stitch you make in front, behind, around or in the front loop of another stitch from a previous round, you must leave the stitch behind or in front of the special stitch unworked (skip 1 stitch) unless instructed otherwise. The skipping of stitches will be mentioned in the photo tutorial, but not in the written pattern.
- The ch1 at the beginning of the round does not count as a stitch and will be skipped when we slip stitch into the first sc at the end of each round.
- Keep the slip stitch that closes the round loose as it will replace the sc below as the last stitch of the next round.
- Visuals are read from right to left.
- The use of stitch markers is optional and mainly intended to encourage and support less experienced crocheters. If finding free front loops is easy for you, you are likely to be quicker by crocheting without stitch markers.
- ‘Optional’ stitch marker placements are suggested for the adventurous beginner and may not be necessary for intermediate and advanced crocheters.
- ‘Suggested’ st marker placements are considered beneficial or essential for correct and easy stitch placement for all crochet levels.
- If you follow the suggested stitch marker placements, take the st markers out of the stitch or front loop after the special stitches have been worked, unless instructed otherwise.