Wrapped In Jamie Border Pattern

The  Square Border gives the square a distinctive frame and enlarges it by 10 rounds (Rounds 21 to 30), which increases the square by about 50% (1,5 times the size of the inner square).

If you intend to make all 12 squares, please read the Introduction page and make yourself familiar with the basic stitches used in the pattern as well as the anatomy of how the special stitches are written.

The introduction contains important information that will make your CAL easier to navigate.

Skill Level

Intermediate and above 

Meaning, you need to know basic stitches like sc, dc, tr, working in front and back loops and making front posts, as well as being confident in counting your stitches and rounds.

However, there are so many explanations, tutorials and support documents, that I like to think that an adventurous beginner will be able to make this border, too. 


Pattern Inclusions in the Extended Pattern

Extended Pattern Version – with special stitches explained above each round, precisely when you need them, hints, tips, and stitch marker placement suggestions. Visuals are added in rounds with repeats.

Special Bonuses (appendixes of the extended pattern):

Special Stitches Overview a complete list of all special stitches used in this pattern. Ideal to be used in conjunction with:

– Chart – the unique Image Overlay Crochet chart. A visual reference to complement (or substitute) the written pattern. Please refer to the pattern notes and the ‘Chart’ chapter in the IOC-1-Basics for ‘Beginner’ Image Overlay Crochet projects and the Special Stitches Overview in conjunction with the chart legend when using the chart.

– Pattern in a Nutshell – the simplified, condensed, and therefore more print-friendly version of the IOC segments of this pattern.

Additional documents:

– IOC-1-Basics for ‘Beginner’ Image Overlay Crochet projects  includes detailed explanations with photo tutorials for the terminology and techniques used in this pattern, as well as important pattern notes. PLEASE READ THIS DOCUMENT FIRST. Each purchased IOC pattern comes with this document. Alternatively, a copy of the IOC document only can be purchased in the shop.

– Photo Tutorial – the written pattern with a detailed photo tutorial for each important or difficult special stitch placement.

Sample Yarn and Yardage

Fingering/Sock/4ply Merino Wool
Gauge 24 sts x 32 rows with a 3mm/US2.5/D-3/UK 11 hook
175m/50g (191yds/1.75oz)
(I used Drops Baby Merino,available as part of  a yarn kit from Wool Warehouse)

Yarn Requirements:
Square Border: approximately 123m/135yds
———————

DK/Light Worsted/8ply Cotton
Gauge 22 sts x 30 rows with a 4mm/US G/6/UK8 hook
100m/50g ( 110yds/1.75oz)

Yarn Requirements:
Square Border: approximately 155m/170yds
———————

Worsted/Aran/10ply Cotton
Gauge 17 sts x 22 rows with a 5mm/US-H/8/UK-6 hook
75m/50g (82yds/1.75oz)
(I used Drops Paris, available as part of  a yarn kit from Wool Warehouse)

Yarn Requirements:
Square Border: approximately 165m/182yds

You will also need:

  • hook as recommended for your choice of yarn or which gives you the desired drape/stiffness – I recommend making a swatch
  • scissors
  • darning needle to weave in ends
  • stitch markers (optional; this could even be just a yarn scrap)

Terminology and Language

This pattern is written in Image Overlay Crochet (IOC) terminology based on US crochet terminology. UK/Australian grammar is primarily used in text passages. Please refer to the IOC-1-Basics for ‘Beginner’ Image Overlay Crochet projects document that comes with any IOC pattern purchase (from August 2023 onwards) to familiarise yourself with the terminology. 

Video Tutorials

Video Tutorials for the more challenging rounds of this pattern are available through the links below. Please note that tutorials marked “old” refer to a previous pattern version and are explained using the terminology of the time (“Petranese”), which has now been updated to IOC. New tutorials using IOC terminology are currently being edited and can be found in the playlist mentioned above or, where relevant, above the old versions.

NEW – Video tutorial for Round 23 – right-handed (also embedded below)

NEW – Video tutorial for Round 23 – left-handed (also embedded below)

NEW – Video tutorial for Round 24 – right-handed (also embedded below)

NEW – Video tutorial for Round 24 – left-handed (also embedded below)

NEW – Video tutorial for Round 25 – right-handed (also embedded below)

NEW – Video tutorial for Round 25 – left-handed (also embedded below)

NEW – Video tutorial for Rounds 26-27 – right-handed (also embedded below)

NEW – Video tutorial for Rounds 26-27 – left-handed (also embedded below)

NEW – Video tutorial for Round 28 – right-handed (also embedded below)

NEW – Video tutorial for Round 28 – left-handed (also embedded below)

NEW – Video tutorial for Rounds 29-30 – right-handed (also embedded below)

NEW – Video tutorial for Round 29-30 – left-handed (also embedded below)

OLD – Video tutorial for Round 24 right-handed 

OLD – Video tutorial for Round 24 – left-handed 

OLD – Video tutorial for Round 25 – right-handed 

OLD – Video tutorial for Round 25 – left-handed 

OLD – Video tutorial for Round 26 – right-handed 

OLD – Video tutorial for Round 26 – left-handed 

OLD – Video tutorial for Round 27 – right-handed 

OLD – Video tutorial for Round 27 – left-handed 

If you have all the information you need to start with the pattern, simply scroll down. The pattern is provided for free indefinitely (or as long as I or those who take over from me when I am gone can manage to pay for hosting).

If you know of someone who you think might enjoy the patterns, please send them directly to this website. Thank you.

Pattern Notes:

  • Ch1 at the beginning of a round does not count as a stitch and needs to be skipped when closing the round with a slip stitch. I recommend to be vigilante with your counting to make sure you have the correct stitch count.

Stitches Overview:

Basic Stitches and Techniques

You should be familiar with sc (single crochet), sc in FLO/BLO (single crochet in front loop/back loop only) working front posts, reading your work and understanding stitch placement as outlined in the document  IOC-1-Basics for ‘Beginner’ Image Overlay Crochet projects. If you are uncertain about working these kind of stitches and techniques, this design is not (yet) suitable for you. 

To avoid confusion and frustration, please practise the basic requirements first using the IOC-1 document provided in your download and come back when you are confident with the basics of crochet (and IOC in particular).

Special Stitches:

Special stitches relevant for the pattern are outlined below.

The extended pattern conveniently includes a list of all relevant special stitches used in each round (respectively once per page) so you don’t have to scroll much forwards or backwards in your pattern. 

Skip 1 st behind (dcbb: in front of) each special stitch, continue in the next stitch.

dcbbdouble crochet into the st behind and below the next st (2 rounds below)

dtr_+3-3 in FLO – double treble in the front loop only of the st 3 ahead and 3 rounds below 

dtr_-3-3 in FLOdouble treble in the front loop only of the st 3 behind and 3 rounds below 

dtr_+3-3 in FLBdouble treble in the front loop AND the loop directly below of the st 3 ahead and 2 rounds below 

dtr_-3-3 in FLBdouble treble in the front loop AND the loop directly below of the st 3 behind and 2 rounds below

fphdcfront post half double crochet around the next st

2TOG-Adtr_-3-3 in FLO/dtr_+3-3 in FLO/<tog2 sts together with 
– leg 1: double treble in the front loop only of the st 3 behind and 3 rounds below and 
– leg 2: double treble in the front loop only of the st 3 ahead and 3 rounds below

2TOG-Bdtr_-3-3 in FLB/dtr_+3-3 in FLB/<tog2 sts together with 
– leg 1: double treble in the front loop AND the loop directly below of the st 3 behind and 3 rounds below and 
– leg 2: double treble in the front loop AND the loop directly below of the st 3 ahead and 3 rounds below

3dc-popcorn_0-2 in FLO popcorn st with 3 double crochet in the front loop only of the st 2 rounds below; alternatively: 3dc-cluster_0-2 in FLO or either st made with 4 instead of 3 dc

Feel free to follow your own colourway and make your insides all the same colour or make them solid or mix and match insides and borders to your heart’s content. I would like for you to make this as much as possible your CAL project and I look forward to seeing your photos.

Remember to tag me in any social media posts and use #wrappedinjamiecal or #desingedbyblacksheepcrochet so I can admire your work.

The Pattern

Round 20:

Working the border with the same colour as you used for your square:

Finish Round 19 of your square with a ss into the first sc of the starting corner.

Round 20: Ch1, 

[(sc, ch2, sc) into the ch2 corner space, 37 sc in 3rd loop] 4 times

Ss into the first sc of the starting corner. – 39 sts per side plus ch2 corner space

Continue with Round 21. 

2.b) Working the border with a different colour to the one you used for your square:

Finish Round 19 of your square by fastening off and close the round with an invisible close. Join the new colour, then work Round 20-2.a). 

If you join the new colour with a standing st, omit the ch1 at the beginning of Round 20.

Ss into the first sc of the starting corner. – 39 sts per side plus ch2 corner space

From here on, please make sure to find the first stitch, as it may sometimes be hidden by the second sc of the corner (sc, ch2, sc)

Round 21:

Ch1, [(sc, ch2, sc) into the ch2 corner space, 
39 sc] 4 times

Ss into the first sc of the starting corner. – 41 sts plus ch2 corner space per side

Round 22: Ch1, [(sc, ch2, sc) into the ch2 corner space, (2 sc, sc in BLO) 13 times, 2 sc] 4 times.

Ss into the top of the first sc of the starting corner. – 43 sts plus ch2 corner space per side

Note: In the following rounds you will be instructed to make popcorn sts and double treble sts. If you crochet with a loose tention, make tr instead of dtr (applies to all dtr, including the legs of 2TOG sts). Instead of popcorn sts, you can work cluster sts. If you want your popcorn or cluster sts to be bigger, make them with 4 instead of 3 double crochet. For chart symbols and stitch descriptions for popcorn and cluster sts, please refer to the IOC-1-Basics for ‘Beginner’ Image Overlay Crochet projects document.

Video for Round 23 is embedded below the photos

Round 23:

Ch1, [(sc, ch2, sc) into the ch2 corner space, 
12 sc, 3dc-popcorn_0-2 in FLO, 17 sc, 3dc-popcorn_0-2 in FLO, 12 sc] 4 times
Ss into the first sc of the starting corner. – 45 sts plus ch2 corner space per side

Hint: Each popcorn st is worked into a FLO of the round below

23.1 – Popcorn in 4th FLO 1 round below

23.2 – Skip indicated st

Round 23 right-handed

Round 23 left-handed

Video for Round 24 is embedded below the photo

Please note that this tutorial still mentioned the previously used terminology.
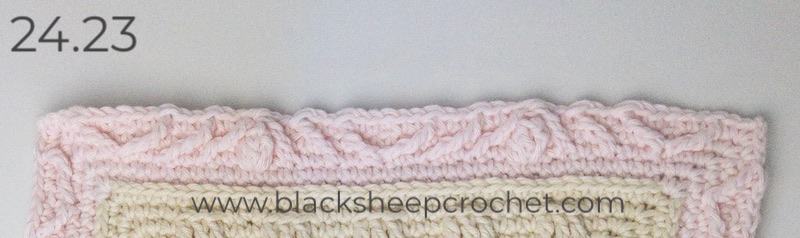
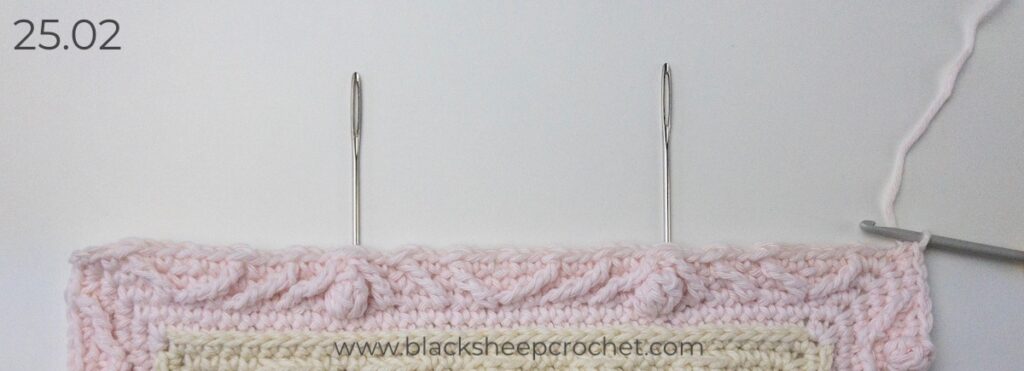
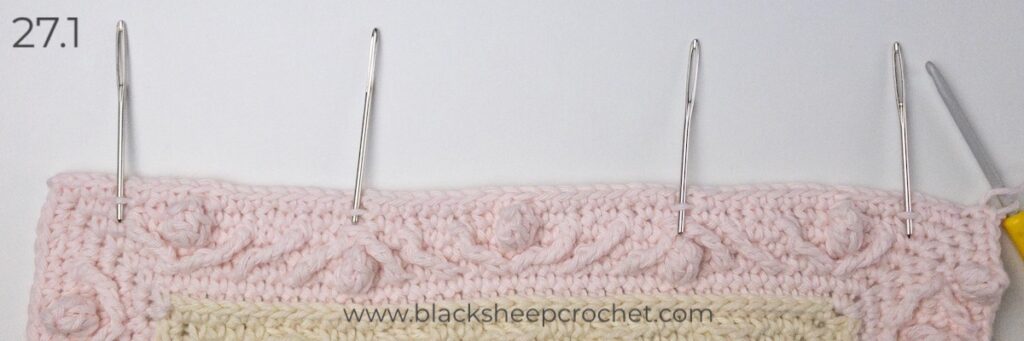
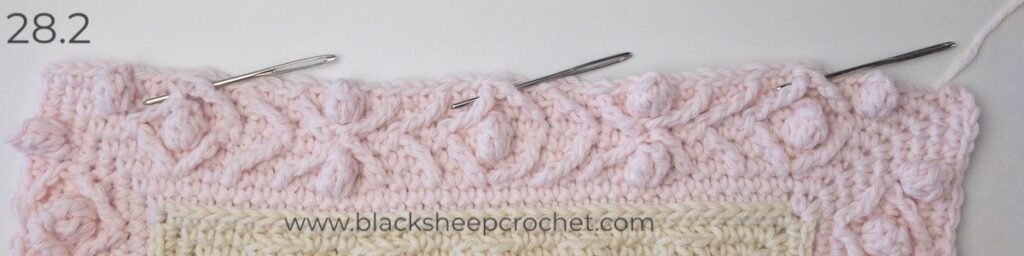
Round 24:

Ch1, [(sc, ch2, sc) into the ch2 corner space, 
*sc, dtr_+3-3 in FLO, 2 sc, sc in BLO, 2 sc^, (dtr_-3-3 in FLO, 2 sc) twice, 2TOG-A, 2 sc, dtr_+3-3 in FLO, sc*, repeat from * to *, repeat from * to ^, dtr_-3-3 in FLO, sc] 4 times

Ss into the first sc of the starting corner. – 47 sts plus ch2 corner space per side

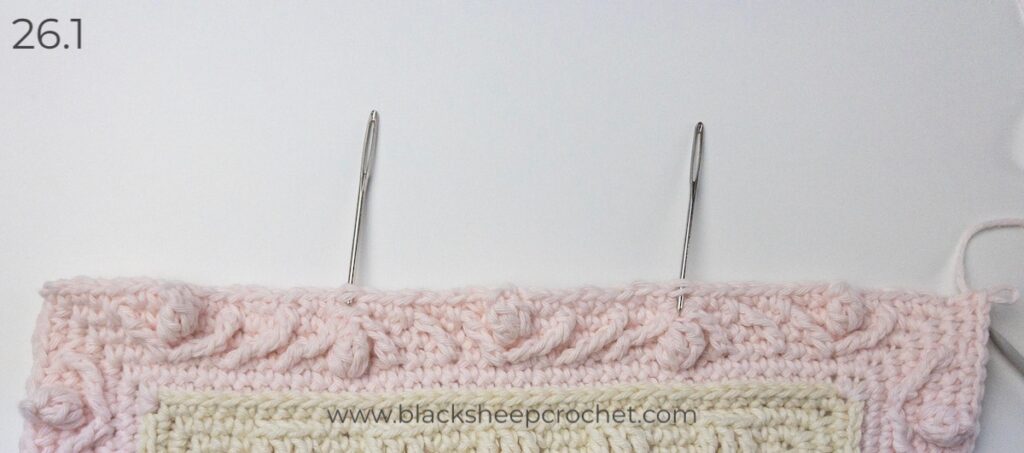
Hint: Each 2TOG-A is directly above a popcorn st from round 23

The “rhythm” of the dtr and 2TOG for Round 24 is:

ahead – back – back – together – ahead –
ahead – back

Border Round 24 Right-Handed

Border Round 24 Left-Handed

Video for Round 25 is embedded below the photos

Round 25:

Ch1, [(sc, ch2, sc) into the ch2 corner space, 
2 sc, dcbb, *2 sc, 3dc-popcorn_0-2 in FLO, (2 sc, dcbb) 5 times*, repeat from * to *2 sc, 3dc-popcorn_0-2 in FLO, 2 sc, dcbb, 2 sc] 4 times

Ss into the first sc of the starting corner. – 49 sts plus ch2 corner space per side

25.1 – Popcorns into indicated stitches

25.2 – dcbb behind 2TOG-A from previous round

Border Round 25 Right-Handed

Border Round 25 Left-Handed

Video for Rounds 26-27 is embedded below the photos of Round 27

Round 26:

Ch1, [(sc, ch2, sc) into the ch2 corner space,
2 sc, sc in
BLO, 3 sc, (dcbb, 8 sc, sc in BLO, 8 sc) twice, dcbb, 3 sc, sc in BLO, 2 sc] 4 times

Ss into the first sc of the starting corner. – 51 sts plus ch2 corner space per side

Hint: The dcbb is behind the popcorn st from the previous round. The sc in BLO are directly above the 2TOG-A from Round 24

26.1 – sc in BLO of indicated stitches

26.2 – dcbb behind popcorn stitches from previous round

26.3 – stitches between indicators are 1st repeat of (dcbb, 8 sc, sc in BLO, 8 sc)

26.4 – stitches between indicators are 2nd repeat of (dcbb, 8 sc, sc in BLO, 8 sc)

A video for this round is embedded below the photos

Round 27:

Ch1, [(sc, ch2, sc) into the ch2 corner space, 
3 sc, 3dc-popcorn_0-2 in FLO, 3 sc, *2TOG-B, (2 sc, dtr_+3-3 in FLB) twice2 sc, 3dc-popcorn_0-2 in FLO, 2 sc, (dtr_+3-3 in FLB, 2 sc) twice*repeat from * to *, 2TOG-B, 3 sc, 3dc-popcorn_0-2 in FLO, 3 sc] 4 times

Ss into the first sc of the starting corner. – 53 sts per side plus ch2 corner space

27.1 – Popcorn stitch into indicated FLOs

Border Round 26-27 Right-Handed

Border Rounds 26-27 Left-Handed

Video for Round 28 is embedded below the photo

Round 28:

Ch1, [(sc, ch2, sc) into the ch2 corner space, 
4 sc, dcbb, 3 sc, *fphdc, (2 sc, dcbb) 5 times, 2 sc*, repeat from * to *,  fphdc, 3 sc, dcbb, 4 sc] 4 times

Ss into the first sc of the starting corner.  – 55 sts per side plus ch2 corner space

28.2 – fphdc around indicated sts (2TOG-B from previous round)

Border Round 28 Right-Handed

Border Round 28 Left-Handed

A video for Rounds 29-30 is embedded below Round 30

Round 29:

[(sc, ch2, sc) into the ch2 corner space, 55 sc] 4 times

Ss into the first sc of the starting corner. – 57 sts per side plus ch2 corner space

Round 30:

Ch1, [(sc, ch2, sc) into the ch2 corner space, 57 sc in 3rd loop] 4 times

Ss into the first sc of the starting corner or fasten off and finish with an invisible close. Weave in the ends – 59 sts per side plus ch2 corner space

Border Rounds 29-30 Right-Handed

Border Rounds 29-30 Left-Handed

Congratulations! Your Border is now finished and your square complete.

Are you annoyed by affiliate links and ads? Me too.

I am therefore slowly removing all affiliate links and ads on the website. Please bear with me while this is happening.

This blog post may still contain a few old affiliate links (in the yarn section). I only ever linked to products or services that I use, would use or that I think are beneficial and of high quality standard for my Black Sheep Crochet Flock. My recommendation was/is neither based on nor influenced by monetary gain.

If you like my patterns and find my service valuable, you can support me by purchasing the pattern PDF or by making a donation on the shop page

Did you know that I offer a 20% discount on my products and patterns for my VIP Black Sheep Crochet Flock Members? You can find a few options at the top in the sidebar. I don’t spam or anything gross like that!

Feel free to share this with your friends on your favourite social media network