Wrapped In Jamie Square 9 – Rebekah Pattern

This post contains affiliate links in form of text links – marked with an asterisk (*) in purple – and banners, all from carefully selected craft suppliers.

When you purchase something through one of the links, I earn a tiny commission – no extra cost to you. Every bit means support towards the expenses of website hosting, email service, secure gateways and all the other tools and apps required to bring these patterns to you. Win-win, right?

Wool Warehouse

Outlanding Stitch Compendium

Since Square 7 – The Duel, the patterns have been written in the new “Petranese” – the Black Sheep Crochet way of writing overlay crochet patterns. 

Squares 1 – 6 are currently updated from ‘OLD’ to ‘NEW’ Petranese. If you are not yet familiar with the new system, you can download your free copy of the Outlanding Stitch Compendium with explanations, instructions and photo tutorials for some special stitches here:

Alternatively, visit the online version (currently still a work in progress) 

Outlanding Stitch Compendium Resource Page

or check out the ‘Petranese’ explained

Background Story and Designer's Thoughts

If you are interested in the background story and thoughts about the inspiration for design, colour and choice of stitches used, you can do that here:

Square 9 – Rebekah – Background Story and Designer’s Thoughts

Introduction and FAQ

Please refer to the Pattern Introduction and FAQ page for general information about

-Skill Level
-Gauge
-Recommended Yarn and Yardage
-Yarn Kit Colour Suggestions
-12 Square Layout Samples for Jamie, Claire and Scotland colourway in solid colours and 
-Terminology

Video Tutorials

You can find all video tutorials for this and other released squares in my YouTube Channel for Black Sheep Crochet, where you can also subscribe for automatic notification when new videos are uploaded.

All videos are also in Germanised British English US crochet terms Petranese.

NO VIDEO TUTORIAL MAY BE CREATED FROM THIS PATTERN – IN ANY LANGUAGE – WITHOUT THE DESIGNER’S WRITTEN PERMISSION!

PDF Download

Your resources for this pattern are
a free written pattern page (this one)
– including finished round pictures and
picture tutorial for tricky stitches
a free video tutorial (right-handed and left-handed version)
– pattern support in our dedicated Facebook and Ravelry groups

There is no obligation to download the PDF version of this pattern. If you are a bit tech savvy or know someone who is, you can make a PDF from the website.

However, if you like the pattern and want to support my design work or appreciate the pattern without ads to take along with you, there is an option to purchase the ad-free PDF version of this pattern for a small contribution through the shop. 

PDF purchases include the following bonuses:

  • a 32 page pattern booklet
  • my very own unofficial, hand ‘written’ design chart
  • Visuals for all rounds with special stitches / repeats or repeats within repeats / complicated rounds
  • Suggestions and photos for stitch marker placement
  • pattern as written pattern only AND detailed step-by-step, close-up photo tutorial pattern version

Chart Preview

Translations

The patterns are currently only available in Germanised British English US crochet terms Petranese.

There are plans to have the patterns translated into different languages at a later stage.

THIS PATTERN MUST NOT BE TRANSLATED INTO ANOTHER LANGUAGE (EXCEPT FOR YOUR OWN PERSONAL USE) WITHOUT THE DESIGNER’S WRITTEN PERMISSION!

You will also need

  • scissors
  • darning needle to weave in ends
  • minimum of 28 stitch markers* (generally optional, but highly recommended for less experienced crocheters. However, you will need some sort of stitch marker to make this pattern. They could even be  yarn scraps as an alternative to regular stitch markers. Hair pins or paperclip that are usually another alternative to stitch markers won’t work very well for the purpose they are used for in this pattern)

Reminder and Important Pattern Notes

For each special stitch you make in front, behind, around or in the front loop of another stitch from a previous round, you must leave the stitch behind or in front of the special stitch unworked (skip 1 stitch) unless instructed otherwise. 

The ch1 at the beginning of the round does not count as a stitch and will be skipped when we slip stitch into the first sc at the end of each round.

Keep the slip stitch that closes the round loose as it will replace the sc below as the last stitch of the next round.

The use of stitch markers* is optional and mainly intended to encourage and support less experienced crocheters. If finding free front loops is easy for you, you are likely to be quicker by crocheting without stitch markers.

Optionalstitch marker* placements are suggested for the adventurous beginner and may not be necessary for intermediate and advanced crocheters.

Suggestedstitch marker* placements are considered beneficial or essential for correct and easy stitch placement for all crochet levels.

If you follow the suggested stitch marker* placements, take the st markers out of the stitch or front loop after the special stitches have been worked, unless instructed otherwise.

Wool Warehouse

Specials Stitches used in this pattern

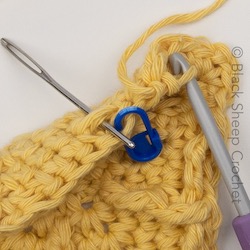
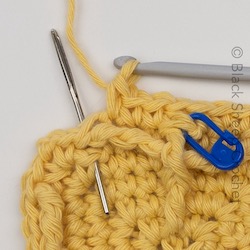
Special stitches relevant for this pattern are outlined below and specified in more detail above each round.

Skip 1 st behind (dcbb: in front of) each special stitch, continue in the next.

fpscfront post single crochetsc around the next st 

hdcbb half double crochet into the st behind and below the next st (2 rounds below)

dcbbdouble crochet into the st behind and below the next st (2 rounds below) 

fphtr_0-2front post half treble around the st 2 rounds below the next st

fphtr_+1-2 front post half treble around the st 1 ahead and 2 rounds below the next st 

fphtr_-1-2front post half treble around the st 1 behind and 2 rounds below the next st

tr_0-3 treble in the st 3 rounds below the next st

tr_0-3 in FLOtreble in FLO of the st 3 rounds below the next st

tr_+2-2treble in the st 2 ahead and 2 rounds below the next st

fptr_-2-0front post treble around the st 2 behind the next st in the same round 

fptr_+2-2front post treble around the st 2 ahead and 2 rounds below the next st

fptr_-2-2 front post treble around the st 2 behind and 2 rounds below the next st 

dtr_+3-2 double treble in the st 3 ahead and 2 rounds below the next st

dtr_+4-2 double treble into the st 4 ahead and 2 rounds below the next st

fpdtr_-3-0 front post double treble around the st 3 behind the next st in the same round

fpdtr_-4-0 front post double treble around the st 4 behind the next st in the same round

cup st_-3 cup st (hdc, sc, hdc) into the st 3 rounds below the next st

4lp puff st in 3rd/BL puff st with 2 yo (= 4 loops + 1 already on hook) in the BL and 3rd loop of the next st – yo, insert hook in BL and 3rd loop of the next st, yo and pull through, pull yarn up to 2x height of a sc, *yo, insert hook in the same BL and 3rd loop, yo and pull through, pull yarn up to the same height as before*, yo and pull through all loops on the hook, close with a ch (ch does not count as a st). For a bigger puff st (flame), repeat instructions between asterisks (*) 

Skip 1 st behind each special st, skip 1 st in front of each dcbb

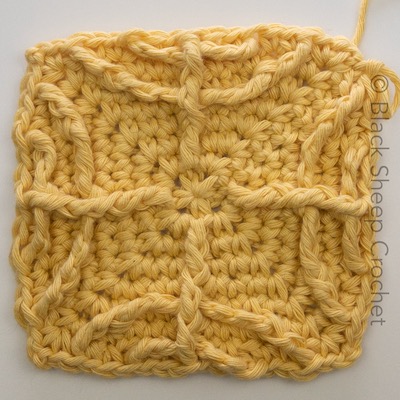
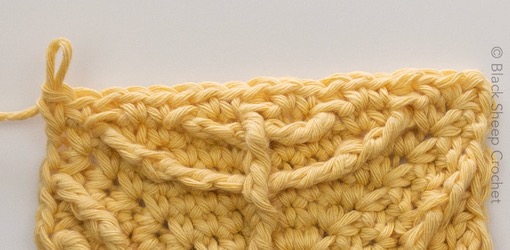
Please note: The special stitches work well for crocheters/crochettes with a ‘normal’ or ‘tight’ tension. If your tension is loose,  you will find that using tr instead of dtr will give you a cleaner and crisper stitch definition. 

Pattern

Begin

with a Magic Circle (MC) or Double Magic Circle (DMC). 

If you are unfamiliar with the MC / DMC or don’t want to use it and you don’t mind the hole in the middle of the square, you can start with 2 ch and crocheting Round 1 into the first ch.

Shop Darn Good Yarn

Round 1

Ch1, [sc into MC / DMC, ch2] 4 times. Close your MC / DMC tightly.

Ss into the first sc of the corner to close the round . – 1 stitch per side plus ch2 corner space

Note: If you crochet over the loose tail for a few rounds, you won’t have to weave it in later

Round 2

Ch1, [(sc, ch2, sc) into the ch2 corner space,

sc in BLO] 4 times. 

Ss into the first sc of the starting corner. –
3 sts per side plus ch2 corner space

Optional stitch marker* placement for Round 4: 

Colour A (blue) in the free FL of the st from Round 1

Round 3

 Ch1, [(sc, ch2, sc) into the ch2 corner space,

3 sc] 4 times.

Ss into the first sc of the starting corner. –
5 sts per side plus ch2 corner space

Special Stitch in Round 4:

  • tr_0-3 in FLOtreble in FLO of the st 3 rounds below the next st 
    (free FL of the st from Round 1 with st marker) Skip 1 st behind the tr_0-3

Round 4

Ch1, [(sc, ch2, sc) into the ch2 corner space,

2 sc, tr_0-3 in FLO, 2 sc] 4 times.

Ss into the first sc of the starting corner. –
7 sts per side plus ch2 corner space

Optional stitch marker*  placement for Round 6: 

Colour A (blue) into the top loops of the tr_0-3 in FLO

(shown on one side only)

Special Stitch in Round 5:

  • dcbbdouble crochet into the st behind and below the next st (2 rounds below) 

Skip 1 st in front of the dcbb

Round 5

Ch1, [(sc, ch2, sc) into the ch2 corner space,

3 sc, dcbb, 3 sc] 4 times. 

Ss into the first sc of the starting corner. – 
9 sts per side plus ch2 corner space

Special Stitches in Round 6:

  • dtr_+4-2 double treble into the st 4 ahead and 2 rounds below the next st (top loops of the tr_0-3 from Round 4) 
  • fphtr_0-2front post half treble around the st 2 rounds below the next st (around the tr_0-3 from Round 4 with st marker, in front of the dtr_+4-2)
  • fpdtr_-4-0 front post double treble around the st 4 behind the next st in the same round (around the dtr_+4-2 from this round behind the fphtr_0-2; you may need to tuck it out a bit from under the fphtr_0-2, which stays in front) 
    Skip 1 st behind each special st
myBluprint.com

Round 6

Ch1, [(sc, ch2, sc) into the ch2 corner space,

dtr_+4-2, 3 sc, fphtr_0-2,

3 sc, fpdtr_-4-0] 4 times. 

Ss into the first sc of the starting corner. –
11 sts per side plus ch2 corner space

Optional stitch marker* placement for Round 8:

Colour A (blue) into the top loops of the fphtr_0-2 

Special Stitch in Round 7:

  • dcbbdouble crochet into the st behind and below the next st (2 rounds below)
    Skip 1 st in front of the dcbb

Round 7

Ch1, [(sc, ch2, sc) into the ch2 corner space,

sc, (dcbb, 3 sc) twice,

dcbb, sc] 4 times. 

Ss into the first sc of the starting corner. –
13 sts per side plus ch2 corner space

Special Stitches in Round 8:

  • fptr_+2-2front post treble  around the st 2 ahead and 2 rounds below the next st  (around the dtr_+4-2 from Round 6)
  • dtr_+3-2 double treble in the st 3 ahead and 2 rounds below the next st                  (top loops of fphtr_0-2 from Round 6)
  • fphtr_0-2 front post half treble around the st 2 rounds below the next st              (around the fphtr_0-2 from Round 6 with st marker, in front of the dtr_+3-2)
  • fpdtr_-3-0 front post double treble around the st 3 behind the next st in the same round (around the dtr_+3-2 from this round, behind the fphtr_0-2; you may need to tuck it out a bit from under the fphtr_0-2, which stays in front)
  • fptr_-2-2 front post treble  around the st 2 behind and 2 rounds below the next st  (around the dtr_-4-0 from Round 6) 
    Skip 1 st behind each special st

Round 8

Ch1, [(sc, ch2, sc) into the ch2 corner space,
fptr_+2-2, 2 sc, dtr_+3-2, 2 sc, fphtr_0-2, 2 sc, fpdtr_-3-0, 2 sc, fptr_-2-2] 4 times. 

Ss into the first sc of the starting corner. –
15 sts per side plus ch2 corner space

Optional stitch marker* placement for Round 10:

Colour A (blue) into the top loops of the fphtr_0-2  

Shop deals of the week at shop.mybluprint.com!Make creativity easy with the must-try subscription box for anyone who loves to craft

Special Stitch in Round 9:

  • dcbbdouble crochet into the st behind and below the next st (2 rounds below)      
    Skip 1 st in front of the dcbb

Round 9

Ch1, [(sc, ch2, sc) into the ch2 corner space,

sc, (dcbb, 2 sc) 4 times,

dcbb, sc] 4 times. 

Ss into the first sc of the starting corner. –
17 sts per side plus ch2 corner space

Special Stitches in Round 10:

    • fptr_+2-2 front post treble  around the st 2 ahead and 2 rounds below the next st (fptr_+2-2 from Round 8)
    • fptr_-2-2front post treble  around the st 2 behind and 2 rounds below the next st (fptr_-2-2 from Round 8)
    • tr_+2-2treble in the st 2 ahead and 2 rounds below the next st (top loops of the fphtr_0-2 from Round 8)
    • fptr_-2-0front post treble  around the st 2 behind the next st in the same round (tr_+2-2 from this round; you may need to tuck it out a bit from under the fphtr_0-2, which stays in front)
    • fphtr_0-2 front post half treble around the st 2 rounds below the next st (fphtr_0-2 from Round 8)
      Skip 1 st behind each special st

Round 10

Ch1, [(sc, ch2, sc) into the ch2 corner space

(fptr_+2-2, 2 sc) twicetr_+2-2,

sc, fphtr_0-2, sc, fptr_-2-0,

(2 sc, fptr_-2-2) twice] 4 times. 

Ss into the first sc of the starting corner. –
19 sts per side plus ch2 corner space

If you enjoy this pattern, please tell your friends about it on Ravelry, Facebook or Instagram. Let them – and me! – see your finished square with hashtag #black_sheep_crochet, #wrappedinjamie, #wrappedinjamiecal or #square9

For pattern support, you can join our Facebook Group
This group is incredibly supportive and we have a lot of fun there. You will be able to interact with me there and if you have a question, it will probably be answered before I even see it by one of our awesome Wrapped in Jamie Clan members. 
 
For posts that are Outlander but not Wrapped in Jamie CAL related, join our 
Community Chatter facebook group

In case you want to see all Black Sheep Crochet activities, you can follow the facebook page here:
https://www.facebook.com/blacksheepcrochetdesign/

If you are not a facebook fan, join the Ravelry group. I am still learning how to create groups and put the patterns up there. Also, due to an error when I first set up the group, I can’t offer the patterns for Season 1 on Ravelry, but we should be fine for Seasons 2 and 3. Bear with me!
https://www.ravelry.com/groups/wrapped-in-jamie-cal-project-group—black-sheep-crochet/

Not keen on Ravelry either?
Join the Wrapped in Jamie Clan email list for all exclusive WIJ CAL updates. No spam, no salesy emails, -just WIJ!

Check out all subscribe options here:
https://blacksheepcrochet.com/joining-the-flock/

Shop Darn Good Yarn

Special Stitch in Round 11:

  • dcbbdouble crochet into the st behind and below the next st (2 rounds below)
    Skip 1 st in front of the dcbb

Round 11

Ch1, [(sc, ch2, sc) into the ch2 corner space,

sc, (dcbb, 2 sc) twice

(dcbb, sc) twice, dcbb,

(2 sc,dcbb) twice, sc] 4 times. 

Ss into the first sc of the starting corner. –
21 sts per side plus ch2 corner space

myBluprint.com

Special Stitches in Round 12:

  • fphtr_+1-2 front post half treble around the st 1 ahead and 2 rounds below the next st (2 x fptr_+2-2 and 1 x tr_+2-2 from Round 10)
  • fphtr_-1-2front post half treble around the st 1 behind and 2 rounds below the next st (1 x tr_-2-2  and 2 x fptr_-2-2 from Round 10)
  • fphtr_0-2front post half treble around the st 2 rounds below the next st (fphtr from Round 10)
    Skip 1 st behind each special st

Round 12

Ch1, [(sc, ch2, sc) into the ch2 corner space,

sc, (fphtr_+1-2, 2 sc) 3 times, fphtr_0-2,

(2 sc, fphtr_-1-2) 3 times, sc] 4 times. 

Ss into the first sc of the starting corner. –
23 sts per side plus ch2 corner space

Optional stitch marker* placement for Round 15:

Colour A (blue) into the top loops of each fphtr_0-2  

Round 14 will be worked in 3rd loops only. If you find making sc in the 3rd loop difficult, please refer to ‘Hint for Rounds 13/14, 19/20 (and 29/30 of the Border)’ in theOutlanding Stitch Compendium’ to make this easier.

Special Stitch in Round 13:

  • dcbbdouble crochet into the st behind and below the next st (2 rounds below)
    Skip 1 st in front of the dcbb

Round 13

Ch1, [(sc, ch2, sc) into the ch2 corner space, 

(2 sc,dcbb) 7 times, 2 sc] 4 times.

Ss into the first sc of the starting corner. –
25 sts per side plus ch2 corner space

Suggested stitch marker* placement for Round 17:

Colour B (red) into the top loops of each dcbb  
(the picture shows Round 14 with the st markers in Round 13)

Round 14

Ch1, [(sc, ch2, sc) into the ch2 corner space,

25 sc in 3rd loop] 4 times.

Ss into the sc of the starting corner. –
27 sts per side plus ch2 corner space

Special Stitch in Round 15:

  • cup st_-3 cup st (hdc, sc hdc) into the st 3 rounds below the next st (fphtr’s from Round 12, optionally with st markers in Colour A) 

Note: Even though it consists of 3 sts, the cup st only counts as 1 st for the purpose of stitch count and number of sts that need to be skipped

You will be working around the st markers you placed in the sts of Round 14; they will be inside the ‘cup’. Make sure that you don’t crochet through or over the st makers and that they stay removable

Round 15

Ch1, [(sc, ch2, sc) into the ch2 corner space, 

4 sc, (cup st_-3, 2 sc) 7 times, 2 sc] 4 times. 

Ss into the first sc of the starting corner. – 29 sts per side plus ch2 corner space

Visual for Round 15 (where x = sc and  \_/ = cup st_-3)

xxxx \_/ xx\_/ xx \_/ xx\_/ xx\_/ xx\_/ xx\_/ xxxx

Round 16

Ch1, [(sc, ch2, sc) into the ch2 corner space, 

5 sc(sc (work in the st of Round 14, behind the cup), 

2 sc (work in the st of Round 15, between the cups) ) 6 times

sc (work in the sc behind the cup), 5 sc] 4 times.

Ss into the first sc of the starting corner. –
31 sts per side plus ch2 corner space

Visual for Round 16
(where x = sc,
|x| = sc behind the cup/Round 14 
and x^ = sc between cups/Round 15)

xxxxx |x| x^x^ |x| x^x^ |x| x^x^ |x| x^x^ |x| x^x^ |x| x^x^ |x| xxxxx

Alternative Round 16

Ch1, [(sc, ch2, sc) into the ch2 corner space, 

5 sc(hdcbb (work in the st of Round 14, behind the cup), 

2 sc (work in the st of Round 15, between the cups) )

6 times

hdcbb (work in the sc behind the cup), 5 sc4 times.

Ss into the first sc of the starting corner. –
31 sts per side plus ch2 corner space

Visual for Round 16
(where x = sc, t = hdcbb behind the cup/Round 14 
and x^ = sc between cups/Round 15)

xxxxx t x^x^ t x^x^ t x^x^ t x^x^ t x^x^ t x^x^ t xxxxx

Wool Warehouse

Special Stitch in Round 17:

  • tr_0-4 treble in the st 4 rounds below the next st (sts from Round 13 with st markers in colour B)
    Skip 1 st behind each tr_0-4

Round 17

Ch1, [(sc, ch2, sc) into the ch2 corner space,

6 sc, (tr_+0-4, 2 sc) 7 times, 4 sc] 4 times.

Ss into the first sc of the starting corner. –
33 sts per side plus ch2 corner space

Special Stitch in Round 18:

  • 4lp puff st in 3rd/BL puff st with 2 yo (= 4 loops + 1 already on hook) in the BL and 3rd loop of the next st – yo, insert hook in BL and 3rd loop of the next st, yo and pull through, pull yarn up to 2x height of a sc, *yo, insert hook in the same BL and 3rd loop, yo and pull through, pull yarn up to the same height as before*, yo and pull through all loops on the hook, close with a ch (ch does not count as a st). For a bigger puff st (flame), repeat instructions between asterisks (*) 

Note: You will have to push the finished puff st forward as it will curl to the back when you make the next sc; or leave it to the fpsc in Round 19 to do that.

Round 18

Ch1, [(sc, ch2, sc) into the ch2 corner space, 7 sc, (puff st, 2 sc) 7 times, 5 sc] 4 times. 

Ss into the first sc of the starting corner. – 35 sts per side plus ch2 corner space

Note: Round 20 will be worked in 3rd loops only again. If you decided to use an alternative way of making Rounds 13/14 from the ‘Hints for Rounds 13/14, 19/20 (and 29/30 of the Border)’ in the ‘Outlanding Stitch Compendium’ apply this here as well.
It is recommended to use the same method for all squares and all square borders, especially when the heights of rounds are affected.

Special Stitch in Round 19:

  • fpscfront post single crochetsc around the next st. 
    Skip 1 st behind the fpsc

Round 19

Ch1, [(sc, ch2, sc) into the ch2 corner space,
8 sc, (fpsc, 2 sc) 7 times, 6 sc] 4 times.

Ss into the first sc of the starting corner. –
37 sts per side plus ch2 corner space

If you want to add the square border or work the last round of the square in a different colour, fasten off the first colour now. 

Finish with an invisible join, weave in the ends and skip to ‘Colour change for Round 20’ or continue with the Square Border pattern

Colour change for Round 20:
Although you could add the new colour in any way you wish, the neatest way is by using a standing sc. If you choose this method, omit the ch1 and the first sc at the beginning of Round 20 and continue with the ch2 after the standing sc.

myBluprint.com

Round 20

Ch1, [(sc, ch2, sc) into the ch2 corner space, 37 sc in 3rd loop] 4 times. 

Finish with an invisible join. –
39 sts per side plus ch2 corner space

Fasten off and weave in ends.

Congratulations, your Square 9 – Rebekah is now finished 🙂

If you want to take pretty pictures, you can block your square. 

There are different ways to block a square, which I will write about in a different post.

You can go thrifty or luxurious with your blocking tools* or a mixture of both. Either way, your squares will most likely look straighter with an increased stitch definition when they have been blocked. 

This post contains affiliate links in form of text links – marked with an asterisk (*) in purple – and banners, all from carefully selected craft suppliers.

When you purchase something through one of the links, I earn a tiny commission – no extra cost to you. Every bit means support towards the expenses of website hosting, email service, secure gateways and all the other tools and apps required to bring these patterns to you. It’s a win-win, right?

I participate in the following programs:

Wool Warehouse*

Knitpicks*

WeCrochet*

Lovecrafts*

Deramores*

Blueprint*

Darn Good Yarn*

Knitcrate

Annie’s* 

MumsHandMade*

Creativebug*

Lorem ipsum dolor sit amet, consectetur adipiscing elit. Ut elit tellus, luctus nec ullamcorper mattis, pulvinar dapibus leo.

Curated Yarn Colour Packs Sunrise and Sunset Minis
Curated Yarn Color Packs Forest and Ocean Minis
Curated Yarn Colour Packs Mountain and Desert Minis