
Hundreds of hours have gone into the creation of this pattern that you can access for free.
This post contains affiliate links in form of text links – marked with an asterisk (*) in purple – and banners, all from carefully selected craft suppliers.
When you purchase something through one of the links, I earn a tiny commission – no extra cost to you. Every bit means support towards the expenses of website hosting, email service, secure gateways, and all the other tools and apps required to bring these patterns to you. Thank you for your support and consideration if using those links.

Background Story and Designer's Thoughts
If you are interested in the background story and thoughts about the inspiration for design, colour and choice of stitches used, you can do that here:
Add the pattern to your Ravelry cart
Your purchase includes all parts for the pattern; Part 1 and Part 2 are already in the library; Parts 3 and 4 as well as the photo tutorials for all parts will be delivered as updates.
Not on Ravelry?
Purchase each part individually through the Black Sheep Crochet Shop
Spread the expense – get the single parts for the reduced price as they are released
'Petranese' explained
“Petranese” is the Black Sheep Crochet way of writing overlay crochet patterns.
If you are not yet familiar with this system, you can download your free copy of the ‘Petranese’ explained – Basics with explanations, instructions and photo tutorials for some special stitches here (also included in the pattern purchase):
Alternatively, visit the online version ‘Petranese’ explained Tutorial series
Video Tutorials
You can find all video tutorials for this and other released squares in my YouTube Channel for Black Sheep Crochet, where you can also subscribe for automatic notification when new videos are uploaded.
All videos are in “Germanised British English US crochet terms Petranese”.
This means I am using US crochet terminology within ‘Petranese’, British/Australian speech and grammar for instructions and narrations, ‘spiced’ and ‘enriched’ with germanised expressions due to not being a native English speaker.
NO VIDEO TUTORIAL MAY BE CREATED FROM THIS PATTERN – IN ANY LANGUAGE – WITHOUT THE DESIGNER’S WRITTEN PERMISSION!
4.1 Right-handed video
4.1 Left-handed video
PDF download
As mentioned, hundreds of hours go into the design and creation of the written pattern, charts, photo tutorials, supporting special stitch tutorials, and the videos.
By purchasing the ad-free PDF version of this pattern you support an independent designer and contribute to covering costs for domain, website hosting, email providers, shop features and other technical necessities.
Besides my gratitude and appreciation, you receive the written pattern including extra support and features, like visuals, the special overlay crochet chart which is excellent for easy stitch placement reference, a photo tutorial* and all the links listed relating to this pattern.
(*the photo tutorial for this specific pattern will come to you as a pattern update as soon as it is ready)
You can find the pattern in the shop here:
Add the pattern to your Ravelry cart
Your purchase includes all parts for the pattern; Part 1 and Part 2 are already in the library; Parts 3 and 4 as well as the photo tutorials for all parts will be delivered as updates.
Not on Ravelry?
Purchase each part individually through the Black Sheep Crochet Shop
Spread the expense – get the single parts for the reduced price as they are released.
Photo Tutorial
Coming in January 2021!
In order to ensure the best possible website performance, this pattern will only display a limited number of tutorial pictures. A detailed photo tutorial is available as part of the PDF pattern (added as an update).
Translations
This patterns is currently only available in Germanised British English US crochet terms Petranese.
There are plans to have it translated into different languages later on. If you are experienced and would like to support the translations, please contact the designer.
THIS PATTERN MUST NOT BE TRANSLATED INTO ANOTHER LANGUAGE (EXCEPT FOR YOUR OWN PERSONAL USE) WITHOUT THE DESIGNER’S WRITTEN PERMISSION!
Are you a total beginner and need to learn some crochet basics? Craftsy* have lots of awesome tutorials that will get you ready to attempt this pattern with confidence. Get started with the link below
What you will need
If you have made any of the other Wrapped in Jamie squares , you have an approximate idea of the amount you need for one square.
Claire is as big as four squares including the square border, so it will require approximately the same amount of yarn. Make sure you are rather on the generous site when calculating your yardage.
If this is your first Wrapped in Jamie design, you can get a general idea about yarn requirements here:
Wrapped in Jamie squares Yarn requirements
You will also need
Claire Part 1 (finished up to Round 20)
Claire Part 2 (finished)
Claire Part 3 (finished)
- scissors
- darning needle to weave in ends
- stitch markers* (optional, but highly recommended, this could even be yarn scrap, a hair pin or a paperclip) – if you choose to use stitch markers, it will be good to have at least 4 different colours. And lots of them 😉
Reminder and Important Pattern Notes ( new for Part 4)
Skipping stitches
For each special stitch you make in front, behind, around or in the front loop of another stitch from a previous round, you must leave the stitch behind or in front of the special stitch unworked (skip 1 stitch) unless instructed otherwise. A reminder to skip those stitches will be written under the special stitches for each round, not within the pattern instructions. If more than one special stitch has been worked and therefore more than one stitch needs to be skipped, a reminder is included in the pattern instructions.
It is not necessary to skip a stitch when the special stitch is being worked over a stitch and therefore envelopes it, as it is for example the case with spike and split spike stitches, hdc-arounds or psc and psc-x.
While we skip a stitch behind a long front post stitch, a front post single crochet does not leave a lot of room for skipping (although technically we still skip at least the top loops of the stitch we fpsc around).
The main objective here is to avoid unnecessary increases, so please keep that in mind.
Ch1 and slip stitch
The ch1 at the beginning of the round does not count as a stitch and will be skipped when we slip stitch into the first stitch at the end of each round.
Keep the slip stitch that closes the round loose as it will replace the stitch below as the last stitch of the next round.
Stitch markers
The use of stitch markers* is optional and mainly intended to encourage and support less experienced crocheters. If finding free front loops is easy for you, you are likely to be quicker crocheting without stitch markers.
- ‘Optional’ stitch markers*placements are suggested for the adventurous beginner and may not be necessary for intermediate and advanced crocheters.
- ‘Suggested’ stitch markers* placements are considered beneficial or essential for correct and easy stitch placement for all crochet levels.
If you follow the suggested stitch markers* placements, take the stitch markers out of the stitch or front loop after the special stitches have been worked, unless instructed otherwise.
A psc-x is made when the next st is a special stitch where the stitch behind it is skipped. The nature of the psc requires some anchoring, which is achieved by making the variation psc-x. You can make a psc-x (picot single crochet variation) whenever the pattern calls for a regular psc, but not the other way around.
Stitch markers for
When working the rose bud, it is helpful to place a st marker in the third loop of the first of three sc in BLO you make to start the rose bud. It will make it easier and quicker to find the correct free FLO to ss into in order to close the st. Leave the st marker in place until you worked over the st in the next round, where you will be crocheting into this third loop or the two main loops of the st (your choice).
– Big Rose
After finishing the big rose, place a st marker in the third loop of the last st. You will be crocheting into this loop when working over the big rose in the next round.
– Spike sts and split Spike sts
When working a long forward Spst or spSp st, place a st marker in the next st you will work into; this will make it easier to find the correct st after you have finished the Spst or spSp st.
Special Corners
– Twisted corner
Continuing a twisted corner (where the first fpdc in the corner from the previous round = fpdc-dc1 and the second fpdc in the corner from the previous round = fpdc-dc2):
In the next round, when working the twisted corner, the first fpdc is worked around the fpdc-dc2 of the corner in the previous round (=> will now become the new fpdc-dc1) and the second fpdc is worked – in front of the fpdc just made – around the fpdc-dc1 of the same corner of the previous round (=> will now become the new fpdc-dc2).
See the Twisted Corner st video tutorials
– Puff st corner – (puff st, ch2, puff st) into the ch2 corner space.
The puff st appears to have 2 top loops: the last loop that was on the hook and the closing chain. In relation to the corner space, there will be an ‘inner’ and an ‘outer’ top loop of the puff st. I recommend working into the outer loop on each side and skipping the ‘inner’ loop.
In the corner above the puff st corner, it would look like this:
Make the last st of the side into the ‘outer’ loop of the puff st (normal loop),
skip the ‘inner’ loop (= closing chain of the first corner puff st),
(puff st, ch2, puff st) or (sc, ch2, sc) into the ch2 corner space,
skip the ‘inner’ loop (= normal loop), continue on the next side with the first st into the ‘outer’ loop (= closing ch of the second corner puff st).
The first stitch on the next side (after the second puff st in the corner space) is likely to be hidden, so pull the puff st to the side to reveal that first st before you continue.
A tutorial with photos and videos for right- and left-handlers is available on the website:
Special Stitches used in this pattern
Please note: The special stitches work well for crocheters/crochettes with a ‘normal’ or ‘tight’ tension. If your tension is loose, you will find that using, for example, tr instead of dtr will give you a cleaner and crisper stitch definition.
In contrast, if your tension is very tight, please give an extra yarn over when making long stitches.
Special stitches relevant for this pattern are outlined below and specified in more detail above each round.
Spst_0-3 – Spike st into the corner space 3 rounds below the next st
Spst_+1-2 – Spike stitch into the corner space 1 ahead and 2 rounds below the next st
Spst_-1-2 – Spike stitch into the corner space 1 behind and 2 rounds below the next st
spSp_0-3 – split Spike st into the st 3 rounds below the next st
spSp_+1-2 – split Spike stitch into the st 1 ahead and 2 rounds below the next st
spSp_-1-2 – split Spike stitch into the st 1 behind and 2 rounds below the next st
dcbb – double crochet into the st behind and (2 rounds) below the next st
dc_0-2 in FLO – double crochet in front loop only of the st 2 rounds below the next st
dc_+1-2 in FLO – double crochet in front loop only of the st 1 ahead and 2 rounds below the next st
dc_-1-2 in FLO – double crochet in front loop only of the st 1 behind and 2 rounds below the next st
tr_0-3 in FLO – treble in front loop only of the st 3 rounds below the next st
tr_+2-3 in FLO– treble crochet in front loop only of the st 2 ahead and 3 rounds below the next st
tr_-2-3 in FLO– treble crochet in front loop only of the st 2 behind and 3 rounds below the next st
dtr_0-4 – double treble in the st 4 rounds below the next st
fptr_+1-2 – front post treble around the st 1 ahead and 2 rounds below the next st
fptr_-1-2 – front post treble around the st 1 behind and 2 rounds below the next st
fptr_+1-3 – front post treble around the st 1 ahead and 3 rounds below the next st
fptr_-1-3 – front post treble around the st 1 behind and 3 rounds below the next st
fptr_+2-2 – front post treble around the st 2 ahead and 2 rounds below the next st
fptr_-2-2 – front post treble around the st 2 behind and 2 rounds below the next st
fpdtr_+3-3 – front post double treble around the st 3 ahead and 3 rounds below the next st
fpdtr_-3-3 – front post double treble around the st 3 behind and 3 rounds below the next st
fpdtr_-3-3/fptr_+2-2/<2tog – 2 front post sts together with
- leg 1: a double treble around the st 3 behind and 3 rounds below the next st and
- leg 2: a treble around the st 2 ahead and 2 rounds below the next st
fptr_-2-2/ fpdtr_+3-3/<2tog – 2 front post sts together with
- leg 1: a treble around the st 2 behind and 2 rounds below the next st and
- leg 2: a double treble around the st 3 ahead and 3 rounds below the next st
2tog-a – fptr_+2-2/dtr_+4-1/>2tog – 2 sts together with
- leg 1: a front post treble around the st 2 ahead and 2 rounds below the next st and
- leg 2: a double treble in the top loops of the st 4 ahead and 1 round below the next st
2tog-b – dtr_-4-1/fptr_-2-2/>2tog – 2 sts together with
- leg 1: a double treble in the top loops of the st 4 behind and 1 round below the next st and
- leg 2: a front post treble around the st 2 behind and 2 rounds below the next st
2tog-c – dcbb/dtr_+4-1/>2tog – 2 sts together with
- leg 1: a double crochet into the st behind and (2 rounds) below the next st and
- leg 2: a double treble in the top loops of the st 4 ahead and 1 round below the next st
2tog-d – dtr_-4-1/dcbb/>2tog – 2 sts together with
- leg 1: a double treble in top loops of the st 4 behind and 1 round below the next st and
- leg 2: a double crochet into the st behind and (2 rounds) below the next st
Puff-a st – Puff around st – yo, insert hook into the chain space 2 rounds below, yo and pull up a loop) 3 times (7 loops on the hook), yo and pull through all loops, ch1 to close the st (ch1 is part of the st and does not count as an extra st or ch)
Note: The puff-a st appears to have 2 top loops: the last loop that was on the hook (the ‘original’ loop) and the closing chain. In the following round, when working over the puff-a st, I recommend working into the ch1 and skipping the original loop of the puff st.
See this Puff st (corner) tutorial
Rose bud – 3 sc in BLO of the next st, 4 sc in FLO of the same st, ss in the third loop of the first st, continue in the next st turning your work by 90° as you go;
Small Rose – ((dc, ch1) twice, dc) into the FLO of the st 2 rounds below, pull the loop up, remove hook from the loop, insert the hook in the top of the first of the dcs, grab the loop and pull through, ch1 to close the small rose (ch1 is part of the st). In the next round, when working over the small rose, work into the ch1.
Add the pattern to your Ravelry cart
Your purchase includes all parts for the pattern; Part 1 and Part 2 are already in the library; Parts 3 and 4 as well as the photo tutorials for all parts will be delivered as updates.
Not on Ravelry?
Purchase each part individually through the Black Sheep Crochet Shop
Spread the expense – get the single parts for the reduced price as they are released.
Pattern Round 51 to 60
Special Stitches in Round 51:
- Twisted corner – (fpdc, ch2, fpdc) into the ch2 corner space; work the first fpdc around the fpdc on the next side 1 round below, ch2, work the next fpdc – in front of the previously made fpdc – around the fpdc on the previous side 1 round below
(see notes for special corners)
- spSp_+1-2 – split Spike stitch into the st 1 ahead and 2 rounds below the next st
- spSp_-1-2 – split Spike stitch into the st 1 behind and 2 rounds below the next st
- spSp_+1-3 – split Spike stitch into the st 1 ahead and 3 rounds below the next st
- spSp_-1-3 – split Spike stitch into the st 1 behind and 3 rounds below the next st
- spSp_+2-1 – split Spike stitch into the st 2 ahead and 1 round below the next st
- spSp_-2-1 – split Spike stitch into the st 2 behind and 1 round below the next st
- spSp_+2-2 – split Spike stitch into the st 2 ahead and 2 rounds below the next st (This spSp is worked into another spSp)
- spSp_-2-2 – split Spike stitch into the st 2 behind and 2 rounds below the next st (This spSp is worked into another spSp)
- dcbb – double crochet into the st behind and (2 rounds) below the next st
- fptr_+1-2 – front post treble around the st 1 ahead and 2 rounds below the next st
- fptr_-1-2 – front post treble around the st 1 behind and 2 rounds below the next st
- fptr_+2-1 – front post treble around the st 2 ahead and 1 round below the next st
- fptr_-2-1 – front post treble around the st 2 behind and 1 round below the next st
- fpdtr_+3-2 – front post double treble around the st 3 ahead and 2 rounds below the next st
- fpdtr_-3-2 – front post double treble around the st 3 behind and 2 rounds below the next st
- 2tog-c – dcbb/dtr_+4-1/>2tog – 2 sts together with
- leg 1: a double crochet into the st behind and (2 rounds) below the next st
- leg 2: a double treble in the top loops of the st 4 ahead and 1 round below the next st
- 2tog-d – dtr_-4-1/dcbb/>2tog – 2 sts together with
- leg 1: a double treble in top loops of the st 4 behind and 1 round below the next st and
- leg 2: a double crochet into the st behind and (2 rounds) below the next st
Skip 1 st behind (dcbb: in front of) each special st (does not apply to spSp)
Round 51: Ch1, [twisted corner,
9 sc, fpdtr_+3-2, 6 sc, spSp_+1-3,
4 sc, fptr_-1-2, 9 sc, 2tog-c, 3 sc, dcbb,
fptr_+2-1, sc, spSp_+2-1, 5 sc, spSp_+2-2,
2 sc, spSp_+1-2, 3 sc, spSp_-1-2, 2 sc, spSp_-2-2,
5 sc, spSp_-2-1, sc, fptr_-2-1, dcbb, 3 sc, 2tog-d,
9 sc, fptr_+1-2, 4 sc, spSp_-1-3, 6 sc, fpdtr_-3-2, 9 sc] 4 times.
Ss into the first fpdc of the starting corner. –
101 sts per side plus ch2 corner space
Round 51 RH
Round 51 LH
Special Stitches in Round 52:
- Twisted corner – (fpdc, ch2, fpdc) into the ch2 corner space; work the first fpdc around the fpdc on the next side 1 round below, ch2, work the next fpdc – in front of the previously made fpdc – around the fpdc on the previous side 1 round below
- psc – picot single crochet – insert hook in next st, yo and pull through (2 loops on hook), ch3 (= pull yarn through only the last loop made, 3 times, keeping the first loop on the hook) (2 loops on hook), yo and pull through 2 loops, continue with the next st (keep the ch3/picot in the front)
- spSp_+2-2 – split Spike stitch into the st 2 ahead and 2 rounds below the next st (This spSp is worked into another spSp)
- spSp_-2-2 – split Spike stitch into the st 2 behind and 2 rounds below the next st (This spSp is worked into another spSp)
- dtr_0-4 – double treble in the st 4 rounds below the next st
- fptr_+2-1 – front post treble around the st 2 ahead and 1 round below the next st
- fptr_-2-1 – front post treble around the st 2 behind and 1 round below the next st
- fptr_+2-2 – front post treble around the st 2 ahead and 2 rounds below the next st
- fptr_-2-2 – front post treble around the st 2 behind and 2 rounds below the next st
- 3tog-a – fptr_-2-2/fpdtr_+1-3/fpdc_+2-1/>3tog – 3 front post sts together with
- leg 1: a treble around the st 2 behind and 2 rounds below the next st and
- leg 2: a double treble around the st 1 ahead and 3 rounds below the next st and
- leg 3: a double crochet around the st 2 ahead and 1 round below the next st
- 3tog-b – fpdc_-2-1/fpdtr_-1-3/fptr_+2-2/>3tog – 3 front post sts together with
- leg 1: a double crochet around the st 2 behind and 1 round below the next st and
- leg 2: a double treble around the st 1 behind and 3 rounds below the next st and
- leg 3: a treble around the st 2 ahead and 2 rounds below the next st
Skip 1 st behind each special st (does not apply to psc, spSp sts or rose bud)
Round 52: Ch1, [twisted corner,
(sc, psc) 3 times, 2 sc, 3tog-a, 3 sc, spSp_+2-2,
(2 sc, psc) twice, 16 sc, fptr_+2-1, 4 sc, psc, 4 sc, fptr_-2-2, 4 sc,
dtr_0-4, 4 sc, fptr_+2-2, 4 sc, psc, 4 sc, fptr_-2-1,
16 sc, (psc, 2 sc) twice, spSp_-2-2, 3 sc, 3tog-b, 2 sc, (psc, sc) 3 times] 4 times.
Ss into the first fpdc of the starting corner. –
103 sts per side plus ch2 corner space
Optional stitch marker placements for Round 55:
- Colour A/red in the top loops of the 3tog-a and 3tog-b made in this round
- Colour C/green in the top loops of the dtr_0-4 made in this round
Special Stitches in Round 53:
- Twisted corner – (fpdc, ch2, fpdc) into the ch2 corner space; work the first fpdc around the fpdc on the next side 1 round below, ch2, work the next fpdc – in front of the previously made fpdc – around the fpdc on the previous side 1 round below
- psc – picot single crochet – insert hook in next st, yo and pull through (2 loops on hook), ch3 (= pull yarn through only the last loop made, 3 times, keeping the first loop on the hook) (2 loops on hook), yo and pull through 2 loops, continue with the next st
(keep the ch3/picot in the front) - spSp_0-3 – split Spike st into the st 3 rounds below the next st
- spSp_+1-2 – split Spike stitch into the st 1 ahead and 2 rounds below the next st
- spSp_-1-2 – split Spike stitch into the st 1 behind and 2 rounds below the next st
- spSp_+1-3 – split Spike stitch into the st 1 ahead and 3 rounds below the next st
- spSp_-1-3 – split Spike stitch into the st 1 behind and 3 rounds below the next st
- spSp_+3-2 – split Spike stitch into the st 3 ahead and 2 rounds below the next st
- spSp_-3-2 – split Spike stitch into the st 3 behind and 2 rounds below the next st
- dcbb – double crochet into the st behind and (2 rounds) below the next st
- fptr_+2-2 – front post treble around the st 2 ahead and 2 rounds below the next st
- fptr_-2-2 – front post treble around the st 2 behind and 2 rounds below the next st
- fptr_+3-1 – front post treble around the st 3 ahead and 1 round below the next st
- fptr_-3-1 – front post treble around the st 3 behind and 1 round below the next st
- Big Rose – make a bud (3 sc in BLO of the next st, 4 sc in FLO of the same st ); work 2 sc in the 3rd loop of each st around, continue in the next st
Skip 1 st behind (dcbb: in front of) each special st (does not apply to psc and spSp sts)
Note: Please refer to the notes on special corners and st markers for big rose
Round 53: Ch1, [twisted corner,
3 sc, spSp_+1-3, 5 sc, dcbb, 4 sc, psc, 2 sc,
spSp_+1-2, 3 sc, spSp_0-3,
3 sc, fptr_-2-2, sc, big rose, 5 sc, fptr_+3-1, 3 sc,
spSp_+3-2, sc, spSp_+1-2, 4 sc, spSp_-1-3,
3 sc, spSp_+1-2, 2 sc, dcbb, 2 sc, spSp_-1-2, 3 sc,
spSp_+1-3, 4 sc, spSp_-1-2, sc, spSp_-3-2,
3 sc, fptr_-3-1, 5 sc, big rose, sc, fptr_+2-2, 3 sc,
spSp_0-3, 3 sc, spSp_-1-2, 2 sc, psc,
4 sc, dcbb, 5 sc, spSp_-1-3, 3 sc] 4 times.
Ss into the first fpdc of the starting corner. –
105 sts per side plus ch2 corner space
Claire 4.2 Right-handed
Claire 4.2 Left-handed
Special Stitches in Round 54:
- Twisted corner – (fpdc, ch2, fpdc) into the ch2 corner space; work the first fpdc around the fpdc on the next side 1 round below, ch2, work the next fpdc – in front of the previously made fpdc – around the fpdc on the previous side 1 round below
(see notes for special corners) - psc – picot single crochet – insert hook in next st, yo and pull through (2 loops on hook), ch3 (= pull yarn through only the last loop made, 3 times, keeping the first loop on the hook) (2 loops on hook), yo and pull through 2 loops, continue with the next st
(keep the ch3/picot in the front) - spSp_0-3 – split Spike st into the st 3 rounds below the next st
- spSp_+1-2 – split Spike stitch into the st 1 ahead and 2 rounds below the next st
- spSp_-1-2 – split Spike stitch into the st 1 behind and 2 rounds below the next st
- fptr_+2-2 – front post treble around the st 2 ahead and 2 rounds below the next st
- fptr_-2-2 – front post treble around the st 2 behind and 2 rounds below the next st
- fptr_+3-1 – front post treble around the st 3 ahead and 1 round below the next st
- fptr_-3-1 – front post treble around the st 3 behind and 1 round below the next st
Skip 1 st behind each special st (does not apply to psc and spSp sts)
Round 54: Ch1, [twisted corner,
2 sc, psc, 3 sc, psc, 2 sc, (sc in BLO, sc) twice,
spSp_+1-2, 6 sc, psc, 3 sc, psc, 6 sc,
fptr_+3-1, 10 sc, psc, 4 sc, psc, sc, fptr_-2-2,
sc, spSp_0-3, sc, spSp_0-3, sc,
fptr_+2-2, sc, psc, 4 sc, psc, 10 sc,
fptr_-3-1, 6 sc, psc, 3 sc, psc, 6 sc,
spSp_-1-2, (sc, sc in BLO) twice, 2 sc, psc, 3 sc, psc, 2 sc] 4 times.
Ss into the first fpdc of the starting corner. –
107 sts per side plus ch2 corner space
Optional stitch marker placements for Round 55:
- Colour C in the free FL of the sts from Round 53
Special Stitches in Round 55:
- Puff st corner – (puff st, ch2, puff st) into the ch2 corner space; Pull the second puff st to the side to find the first st after the corner (see notes for puff st corners)
- psc – picot single crochet – insert hook in next st, yo and pull through (2 loops on hook), ch3 (= pull yarn through only the last loop made, 3 times, keeping the first loop on the hook) (2 loops on hook), yo and pull through 2 loops, continue with the next st
(keep the ch3/picot in the front) - psc-x – picot single crochet variation – insert hook in front loop only of the next st, yo and pull through, ch3 (= pull yarn through only the last loop made, 3 times, keeping the first loop on the hook), insert hook in the back loop of the same st, yo and pull through 3 loops; continue with the next st (keep the ch3/picot in the front)
- spSp_+1-2 – split Spike stitch into the st 1 ahead and 2 rounds below the next st
- spSp_-1-2 – split Spike stitch into the st 1 behind and 2 rounds below the next st
- spSp_+3-2 – split Spike stitch into the st 3 ahead and 2 rounds below the next st
- spSp_-3-2 – split Spike stitch into the st 3 behind and 2 rounds below the next st
- dcbb – double crochet into the st behind and (2 rounds) below the next st
- tr_0-3 – treble in the st 3 rounds below the next st
- fptr_-3-1/fptr_+2-2/<2tog – 2 front post sts together with
- leg 1: a treble around the st 3 behind and 1 round below the next st and
- leg 2: a treble around the st 2 ahead and 2 rounds below the next st
- fptr_-2-2/fptr_+3-1/<2tog – 2 front post sts together with
- leg 1: a treble around the st 2 behind and 2 rounds below the next st and
- leg 2: a treble around the st 3 ahead and 1 round below the next st
- Clover Blossom – 6 sts together with
- leg 1: a treble in the FLO of the st 1 behind and 2 rounds below the next st and
- leg 2: a double treble in the FLO of the st 1 behind and 2 rounds below the next st (same FLO as leg 1) and
- legs 3 and 4: a triple treble in the st 3 rounds below the next st
- leg 5: a double treble in the FLO of the st 1 ahead and 2 rounds below the next st
- leg 6: a treble in the FLO of the st 1 ahead and 2 rounds below the next st (same FLO as leg 5)
Skip 1 st behind (dcbb: in front of) each special st (does not apply to psc, psc-x or spSp sts)
Round 55: Ch1, [puff st corner,
5 sc, psc, 3 sc, psc, sc, clover blossom, 3 sc,
psc, sc, psc-x, spSp_+1-2, psc, 3 sc, psc, 5 sc,
fptr_-2-2/fptr_+3-1/<2tog, 6 sc, spSp_+3-2, sc, psc, 2 sc, psc, 3 sc,
spSp_0-4, sc, spSp_-1-2, 5 sc, tr_0-3, ,
5 sc, spSp_+1-2, sc, spSp_0-4, 3 sc, psc, 2 sc, psc, sc, spSp_-3-2, 6 sc,
fptr_-3-1/fptr_+2-2/<2tog, 5 sc, psc, 3 sc, psc-x, spSp_-1-2, psc, sc, psc,
3 sc, clover blossom, sc, psc, 3 sc, psc, 5 sc] 4 times.
Ss into the first puff st of the starting corner. –
109 sts per side plus ch2 corner space
Optional stitch marker placements for Round 59:
- Colour A in the top loops of the 2tog sts made in this round
Add the pattern to your Ravelry cart
Your purchase includes all parts for the pattern; Part 1 and Part 2 are already in the library; Parts 3 and 4 as well as the photo tutorials for all parts will be delivered as updates.
Not on Ravelry?
Purchase each part individually through the Black Sheep Crochet Shop
Spread the expense – get the single parts for the reduced price as they are released.
Special Stitches in Round 56:
- Puff st-corner – (puff st, ch2, puff st) into the ch2 corner space; Pull the second puff st to the side to find the first st after the corner
- psc – picot single crochet – insert hook in next st, yo and pull through (2 loops on hook), ch3 (= pull yarn through only the last loop made, 3 times, keeping the first loop on the hook) (2 loops on hook), yo and pull through 2 loops, continue with the next st (keep the ch3/picot in the front)
- spSp_0-2 – split Spike st into the st 2 rounds below the next st
- spSp_+2-3 – split Spike stitch into the st 2 ahead and 3 rounds below the next st
- spSp_-2-3 – split Spike stitch into the st 2 behind and 3 rounds below the next st
- dcbb – double crochet into the st behind and (2 rounds) below the next st
- fpdtr-2tog – fpdtr_-3-2/fpdtr_+3-2/<2tog – 2 front post double treble together with
- leg 1: around the st 3 behind and 2 rounds below the next st and
- leg 2: around the st 3 ahead and 2 rounds below the next st
Skip 1 st behind the fpdtr-2tog and in front of the dcbb
Round 56: Ch1, [puff st corner,
2 sc, psc, sc, spSp_+2-3, 3 sc, spSp_-2-3,
6 sc, spSp_0-2, 3 sc, psc, 2 sc, spSp_+2-3, 3 sc, spSp_-2-3,
3 sc, dcbb, 6 sc, psc, 2 sc, spSp_+2-3, 3 sc, spSp_-2-3,
(sc, psc) 3 times, 3 sc, fpdtr-2tog,
3 sc, (psc, sc) 3 times, spSp_+2-3, 3 sc, spSp_-2-3,
2 sc, psc, 6 sc, dcbb, 3 sc, spSp_+2-3, 3 sc, spSp_-2-3,
2 sc, psc, 3 sc, spSp_0-2, 6 sc, spSp_+2-3, 3 sc, spSp_-2-3,
sc, psc, 2 sc] 4 times.
Ss into the first puff st of the starting corner. –
111 sts per side plus ch2 corner space
Claire 4.3 Right-handed
Claire 4.3 Left-handed
Special Stitches in Round 57:
- Puff st-corner – (puff st, ch2, puff st) into the ch2 corner space; Pull the second puff st to the side to find the first st after the corner
- psc – picot single crochet – insert hook in next st, yo and pull through (2 loops on hook), ch3 (= pull yarn through only the last loop made, 3 times, keeping the first loop on the hook) (2 loops on hook), yo and pull through 2 loops, continue with the next st
(keep the ch3/picot in the front) - psc-x – picot single crochet variation – insert hook in front loop only of the next st, yo and pull through, ch3 (= pull yarn through only the last loop made, 3 times, keeping the first loop on the hook), insert hook in the back loop of the same st, yo and pull through 3 loops; continue with the next st (keep the ch3/picot in the front)
- spSp_+2-2 – split Spike stitch into the st 2 ahead and 2 rounds below the next st
- spSp_-2-2 – split Spike stitch into the st 2 behind and 2 rounds below the next st
- spSp_+3-2 – split Spike stitch into the st 3 ahead and 2 rounds below the next st
- spSp_-3-2 – split Spike stitch into the st 3 behind and 2 rounds below the next st
- dcbb – double crochet into the st behind and (2 rounds) below the next st
Skip 1 st behind (dcbb: in front of) each special st (does not apply to psc, psc-x or spSp sts)
Round 57: Ch1, [puff st corner,
7 sc, sc in BLO, 5 sc, psc, 2 sc, sc in BLO,
8 sc, sc in BLO, 4 sc, (sc in BLO, sc) twice,
psc-x, spSp_+3-2, psc, 6 sc, sc in BLO, 7 sc,
spSp_-2-2, 3 sc, dcbb, 3 sc, spSp_+2-2,
7 sc, sc in BLO, 6 sc, psc-x, spSp_-3-2, psc,
(sc, sc in BLO) twice, 4 sc, sc in BLO, 8 sc, sc in BLO,
2 sc, psc, 5 sc, sc in BLO, 7 sc] 4 times.
Ss into the first puff st of the starting
Optional stitch marker placements for Round 58:
- Colour A in the free FL of the first and last 3 sts as well as the 6th st from each corner
- Colour C in the free FL of the 4th and 5th st in from each corner
Special Stitches in Round 58:
- Puff st-corner – (puff st, ch2, puff st) into the ch2 corner space; Pull the second puff st to the side to find the first st after the corner
- psc – picot single crochet – insert hook in next st, yo and pull through (2 loops on hook), ch3 (= pull yarn through only the last loop made, 3 times, keeping the first loop on the hook) (2 loops on hook), yo and pull through 2 loops, continue with the next st
(keep the ch3/picot in the front) - psc-x – picot single crochet variation – insert hook in front loop only of the next st, yo and pull through, ch3 (= pull yarn through only the last loop made, 3 times, keeping the first loop on the hook), insert hook in the back loop of the same st, yo and pull through 3 loops; continue with the next st (keep the ch3/picot in the front)
- spSp_+1-2 – split Spike stitch into the st 1 ahead and 2 rounds below the next st
- spSp_-1-2 – split Spike stitch into the st 1 behind and 2 rounds below the next st
- Popcorn st – popcorn st_0-2 – work 4 double crochet into the st 2 rounds below the next st, pull up a loop, take out the hook and insert it into the top loops of the first of the 4 dcs, grab the loop from the fourth dc and pull through the first. Close the popcorn st with a closing ch (ch1 is part of the st and does not count as an extra st or ch)(Colour A/red stm)
- Clover Blossom – 6 sts together with
- leg 1: a treble in the FLO of the st 1 behind and 2 rounds below the next st and
- leg 2: a double treble in the FLO of the st 1 behind and 2 rounds below the next st (same FLO as leg 1) and
- legs 3 and 4: a triple treble in the st 3 rounds below the next st
- leg 5: a double treble in the FLO of the st 1 ahead and 2 rounds below the next st
- leg 6: a treble in the FLO of the st 1 ahead and 2 rounds below the next st (same FLO as leg 5) (all Colour C/green stms)
Skip 1 st behind the clover blossom and the popcorn st
Note: sc^ marks the centre st of the side
Round 58: Ch1, [puff st-corner,
4 sc, psc-x, spSp_+1-2, psc, sc, popcorn, sc, psc-x, spSp_-1-2, psc,
4 sc, popcorn, sc, psc, 2 sc,
psc-x, spSp_+1-2, psc, sc, popcorn, sc, psc-x, spSp_-1-2, psc,
sc, clover blossom, 3 sc, psc, 3 sc,
psc-x, spSp_+1-2, psc, sc, popcorn, sc, psc-x, spSp_-1-2, psc,
3 sc, psc, 2 sc, sc in BLO, sc^, sc in BLO, 2 sc,
psc, 3 sc, psc-x, spSp_+1-2, psc, sc, popcorn, sc, psc-x, spSp_-1-2, psc,
3 sc, psc, 3 sc, clover blossom, sc,
psc-x, spSp_+1-2, psc, sc, popcorn, sc, psc-x, spSp_-1-2, psc,
2 sc, psc, sc, popcorn, 4 sc,
psc-x, spSp_+1-2, psc, sc, popcorn, sc, psc-x, spSp_-1-2, psc, 4 sc] 4 times.
Ss into the first puff st of the starting corner. –
115 sts per side plus ch2 corner space
Optional stitch marker placement for Round 59:
- Colour C in the free FL of the sts from Round 57 (to either side of the centre st)
Special Stitches in Round 59:
- One-Puff corner – (sc, ch1, puff st, ch1, sc) into the ch2 corner space
- psc – picot single crochet – insert hook in next st, yo and pull through (2 loops on hook), ch3 (= pull yarn through only the last loop made, 3 times, keeping the first loop on the hook) (2 loops on hook), yo and pull through 2 loops, continue with the next st
(keep the ch3/picot in the front) - Clover Blossom – 6 sts together with
- leg 1: a treble in the FLO of the st 1 behind and 2 rounds below the next st and
- leg 2: a double treble in the FLO of the st 1 behind and 2 rounds below the next st (same FLO as leg 1) and
- legs 3 and 4: a triple treble in the st 3 rounds below the next st
- leg 5: a double treble in the FLO of the st 1 ahead and 2 rounds below the next st
- leg 6: a treble in the FLO of the st 1 ahead and 2 rounds below the next st (same FLO as leg 5)
Skip 1 st behind the clover blossom
Round 59: Ch1, [one-puff corner,
3 sc, psc, 2 sc, psc, 5 sc, psc, 2 sc, psc,
8 sc, psc, 5 sc, psc, 11 sc, psc, 5 sc, psc, 8 sc,
clover blossom, 8 sc, psc, 5 sc, psc, 11 sc, psc, 5 sc, psc, 8 sc, psc,
2 sc, psc, 5 sc, psc, 2 sc, psc, 3 sc] 4 times.
Ss into the first sc of the starting corner. –
117 sts per side plus 2 ch1 corner spaces and corner puff st
Note for Round 60: Work the first corner sc into the ch1 space before the puff st of the previous round and the next corner sc in the ch1 space after the puff st.
Round 60: Ch1, [(sc, ch2, sc) into the one-puff corner space as described above, 117 sc ] 4 times.
Cut the yarn and finish off with an invisible join over the first sc of the starting corner. –
119 sts per side plus ch2 corner space
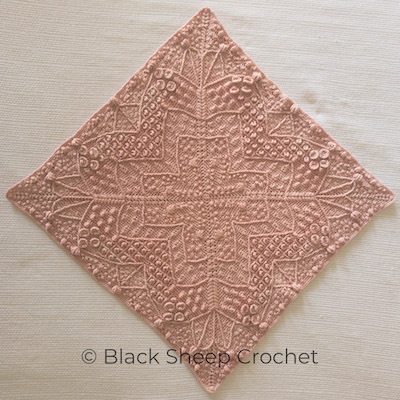
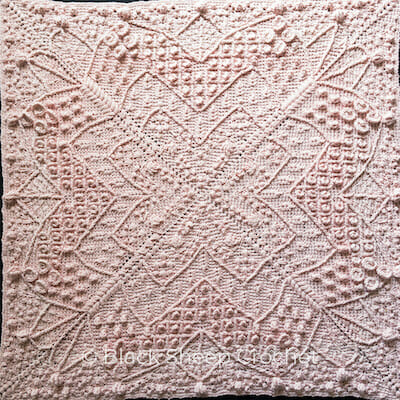
Congratulations!!! Your Claire square is now finished 🙂
Add the pattern to your Ravelry cart
Your purchase includes all parts for the pattern; Part 1 and Part 2 are already in the library; Parts 3 and 4 as well as the photo tutorials for all parts will be delivered as updates.
Not on Ravelry?
Purchase each part individually through the Black Sheep Crochet Shop
Spread the expense – get the single parts for the reduced price as they are released.
If you want to take pretty pictures, you can block your square.
There are different ways to block a square, which I will write about in a different post.
You can go thrifty or luxurious with your blocking tools* or a mixture of both. Either way, your squares will most likely look straighter with an increased stitch definition when they have been blocked.
This post contains affiliate links in form of text links – marked with an asterisk (*) in purple – and banners, all from carefully selected craft suppliers.
When you purchase something through one of the links, I earn a tiny commission – no extra cost to you. Every bit means support towards the expenses of website hosting, email service, secure gateways and all the other tools and apps required to bring these patterns to you. It’s a win-win, right?
I participate in the following programs:


