Wrapped In Jamie Square 1 – Year Of The Ox – Pattern

Hello and welcome to the start of Season 1 in the Wrapped In Jamie Cal – FINALLY! I know that some of you have been setting countdowns on their phones, have delayed house cleaning or got everything in shape in order to be able to start right away.

If you haven’t already, pretty PLEASE have a look at the updated Outlandish Stitch Compendium.
It is a free resource that you can download through the shop.

The Outlandish Stitch Compendium contains a lot of important information, for example how to read the stitches and tips for working rounds 13/14, 19/20 and 29/30 of the border that will make your CAL easier to navigate.

If you are interested in the Background Story and Designer’s Thoughts to this Square , you can read them here.

Scroll down for the FREE pattern.

Skill Level

Concentrated beginner to intermediate crocheter. (The stitches are easy, you just need to concentrate a little)

Recommended Yarn and Yardage

Drops Baby Merino Fingering/Sock/4ply
Gauge 24 sts x 32 rows with a 3mm/US2.5/D-3/UK 11 hook
175m/50g (191yds/1.75oz)
(available as part of  a yarn kit from Wool Warehouse)

Yarn Requirements:
Inner square: approximately 80m/90yds
Square Border: approximately 123m/135yds

Lincraft Homebrand DK/Light Worsted/8ply
Gauge 22 sts x 30 rows with a 4mm/US G/6/UK8 hook
100m/50g ( 110yds/1.75oz)
(sadly, available in Australia only)

Yarn Requirements:
Inner square: approximately 95m95m/105yds
Square Border: approximately 155m/170yds

Drops Paris Worsted/Aran/10ply
Gauge 17 sts x 22 rows with a 5mm/US-H/8/UK-6 hook
75m/50g (82yds/1.75oz)
(available as part of  a yarn kit from Wool Warehouse)

Yarn Requirements:
Inner square: approximately 113m/124yds
Square Border: approximately 165m/182yds

Wool WarehouseWool WarehouseWool Warehouse

You will also need:

  • hook as recommended for your choice of yarn
  • scissors
  • darning needle to weave in end
  • stitch markers (optional, but highly recommended; this could even be a yarn scrap)

Terminology used

This pattern uses US terminology  throughout. 

Abbreviations and the most basic stitches are explained in the Stitch Collection (which is constantly updated), stitches relevant for this specific pattern are outlined below.

Tutorial

A Video Tutorial for this patterns is available here:

Wrapped In Jamie Video Tutorial Square 1 – Year of the Ox right-handed (also embedded below – scroll down to pattern)

Wrapped In Jamie Video Tutorial Square 1 – Year of the Ox left-handed (also embedded below – scroll down to pattern)

You can find all video tutorials for this and other released squares in my YouTube Channel for Black Sheep Crochet, where you can also subscribe for automatic notification when new videos are uploaded.

PDF Download

An ad-free US-terms PDF version is available for AUS$2.95 (with a 30% discount already applied for the first week of the pattern release and if you use your VIP member discount code, that’s AUS$1.60, approx. US$1.08) here:

If you have all the information you need to start with the pattern, simply scroll down. The pattern is provided for free indefinitely (or as long as I or those who take over from me when I am gone can manage to pay for hosting).

 In case you can’t or don’t want to afford the PDF download, you can take screenshots or use an app or whatever to turn this website into a PDF and either print it (for your own personal use) or save it to iBooks or any of your files, as long as you don’t share it with others.

If you know of someone who you think might enjoy the patterns, please send them directly to this website. Thank you.

Pattern Notes

  • We are using the Magic Circle (MC), slip stitch (ss), single crochet (sc), double crochet (dc), half treble (htr), front post half treble (fphtr) and front post double treble (fpdtr) stitches.
  • Ch1 at the beginning of a round does not count as a stitch.

Special Stitches

Special stitches relevant for this specific pattern are outlined below and above each round. 

dc-1b dc in FLO of the stitch directly 1 round below

htr-2bhalf treble in the FLO of the stitch directly 2 rounds below

fphtr-2bfront post half treble around the stitch directly 2 rounds below

fpdtr-4a-1bfront post double-treble around st 4 ahead and 1 round below

fpdtr-4b-1bfront post double-treble around st 4 behind and 1 round below

fptr-1a-2b/fptr-2a-1b-2tog2 front post treble together with first leg around the st 1 ahead and  2 rounds below and second leg around the st 2 ahead and 1 round below

fptr-2b-1b/fptr-1b-2b-2tog2 front post treble together with first leg around the st 2 behind and 1 round below and second leg around the st 1 behind and 2 rounds below

dcbbdouble crochet into the stitch directly  behind and below next st (2 rounds below)

hdcbbhalf double crochet directly behind and below the indicated st (2 rounds below)

hdcbb-x – half double crochet directly behind the st from previous round  – insert hook through both loops of next stitch and additionally through both loops of the st 2 rounds below, then make the hdc

fphdc-1b front post half double crochet in the st directly 1 round below 

tr-3btreble in FLO of st directly 3 rounds below 

Knit Picks Banner

Feel free to follow your own colourway and make your insides all the same colour or make them solid or mix and match insides and borders to your heart’s content. I would like for you to make this as much as possible your CAL project and I look forward to seeing your photos. Please tag me in any social media posts and use #wrappedinjamiecal or #desingedbyblacksheepcrochet so I can admire your work.

For those of you who asked for it, here are my recommendations for colour choices:

If you follow the Storyteller colourway, I recommend a natural or soft brown colour.

Using the yarn kits with six colours for the Diamond Kilt Claire 20, this would be my suggestion:

Jamie: solid square – lightest brown; mixed square – lightest brown for the inside square, petrol for the square border

Claire: solid square – cream; mixed square – cream for the inside square, red for the square border

Scotland: solid square – lightest green; mixed square – lightest green for the inside square, grey/silver for the square border

(Some Scotland colourways contain a light heather, others a light or dark blue or a sea grass colour. The drawing considers those three options)

Jamie

Claire

Scotland

Using only 5 colours and to achieve a more tartan/kilt like effect with solid squares in the Diamond Kilt Claire 20, I suggest the following colourways:

Jamie: lightest brown; Claire: red; Scotland:lightest green

(Thomas says he apologises for the rough colours. These schematics are done with AutoCAD and the colour choices are limited 😉 )

Some of our suppliers offer these colourways as yarn kits. You can check them out here:

Wrapped In Jamie Yarn kits

Jamie

Claire

Scotland

Translations

The pattern is currently only available in US crochet terminology. If you are able and willing to help translate the pattern, please get in touch via email or the contact form on this website. 

Translations of this pattern without the designer’s permission are strictly prohibited.

The Pattern

Begin with a Magic Circle. If you are unfamiliar with the MC or don’t want to use it and you don’t mind the hole in the middle of the square, you can start with ch 2 and crochet round 1 into the first ch.

Round 1: Ch1, [sc into magic circle, ch2] 4 times. Close your magic circle tightly.

Ss into the first sc to close the round (keep this ss loose as it will replace the sc below).

Tip: If you crochet over your loose tail, you can save yourself having to weave ends in later.

From here on, please make sure to find the first stitch, as it may sometimes be hidden by the second sc of the corner (sc, ch2, sc)

Round 2:

Ch1, [(sc, ch2, sc) into the ch2 corner space, sc in next st] 4 times.

Ss into the top of the first sc of the starting corner. – 3 sts per side plus ch2 corner space

Round 3:

Ch1, [(sc, ch2, sc) into the ch2 corner space, sc, sc in BLO, sc] 4 times.

Ss into the top of the first sc of the starting corner. – 5 sts per side plus ch2 corner space

Round 4: Ch1, [(sc, ch2, sc) into the ch2 corner space, (sc, sc in BLO of next st) twice, sc] 4 times.

Ss into the top of the first sc of the starting corner. – 7 sts per side plus ch2 corner space

Round 5:

Ch1, [(sc, ch2, sc) into the ch2 corner space, 2 sc, dc in FLO of the next st 1 round below (Round 4), htr in FLO of the next st 2 rounds below (Round 3), dc in FLO of the next st 1 round below (Round 4) (remember this means you will skip 3 sts on the current round), 2 sc] 4 times.

Ss into the top of the first sc of the starting corner. – 9 sts per side plus ch2 corner space

Round 6:Ch1, [(sc, ch2, sc) into the ch2 corner space, 3 sc, 3 dcbb (in the sts behind the dc, htr, dc from previous round), 3 sc] 4 times.

Ss into the top of the first sc of the starting corner. – 11 sts per side plus ch2 corner space

Round 7: Ch1, [(sc, ch2, sc) into the ch2 corner space, 2 sc, sc in BLO of the next 2 sts, fphtr around each of the (dc, htr, dc) of round 5, sc in BLO of next 2 sts, 2 sc] 4 times.

Ss into the top of the first sc of the starting corner. – 13 sts per side plus ch2 corner space

Round 8:

Ch1, [(sc, ch2, sc) into the ch2 corner space, 2 sc, sc in BLO of next st, dc in FLO of each of the next 2 sts 1 round below, dcbb in each of the next 3 sts {= tops of the sts from Round 6}*, dc in FLO of each of the next 2 sts 1 round below, sc in BLO of next st, 2 sc] 4 times.

Ss into the top of the first sc of the starting corner. – 15 sts per side plus ch2 corner space

*You could instead sc in the next 3 sts. Making dcs behind the stitches gives the pattern more depth and dimension.

Round 9:

Ch1, [(sc, ch2, sc) into the ch2 corner space, 3 sc, dc in FLO of the next st 1 round below (Round 8), 2 dcbb*, fphtr around each of the next 3 sts from 2 rounds below (Round 7), 2 dcbb, dc in FLO of the next st 1 round below (Round 8), 3 sc] 4 times.

Ss into the top of the first sc of the starting corner. – 17 sts per side plus ch2 corner space

*The first of the 2 dc tops could be hidden behind the stitch in front

Round 10:

Ch1, [(sc, ch2, sc) into the ch2 corner space, fpdtr-4a-1b around dc from previous round, (remember to skip 1 st now, which is the 1st st after the corner), 4 sc, fphtr around the next 2 dcs from 2 rounds below (Round 8), 3 dcbb (of the next 3 dc into the top of each sts = dcs from Round 8), fphtr around the next 2 dcs from 2 rounds below (Round 8), 4 sc, fpdtr-4b-1b around the last dc (4 sts back 1 round below)] 4 times.

Ss into the top of the first sc of the starting corner. – 19 sts per side plus ch2 corner space

Watch woodworking classes at myBluprint.com

Round 11:

Ch1, [(sc, ch2, sc) into the ch2 corner space, sc, dcbb the fpdtr from previous round, fpdtr-4a-1b around the next fphtr from previous round (4 sts ahead 1 round below), 5 sc, fphtr around each of the next 3 fphtr from 2 rounds below (Round 9), 5 sc, fpdtr around the last fphtr from previous round (4 sts behind), dcbb the fpdtr from previous round, sc] 4 times.

Ss into the top of the first sc of the starting corner. – 21 sts per side plus ch2 corner space

Round 12:

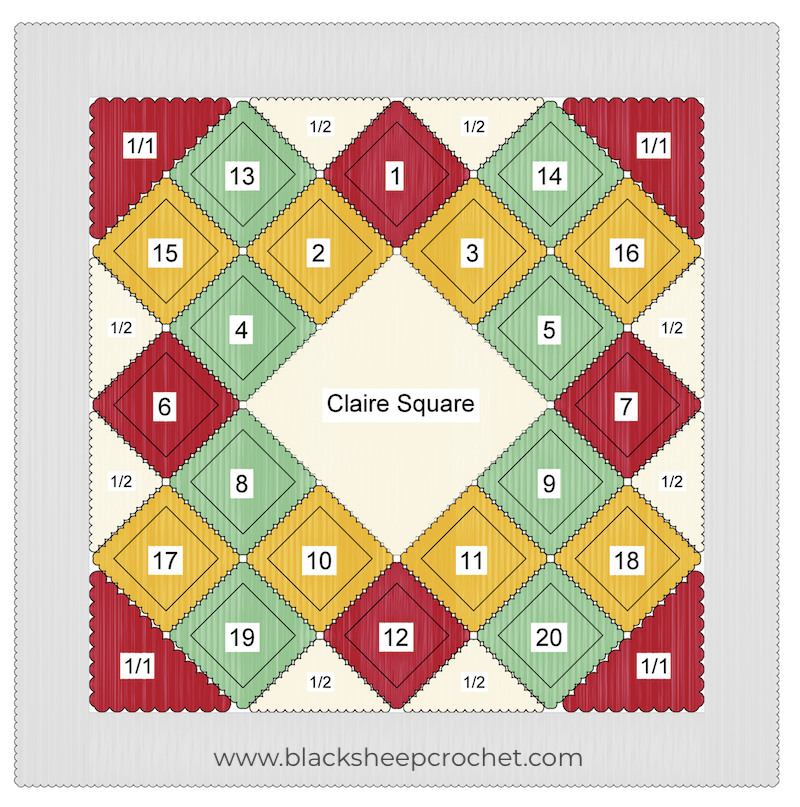
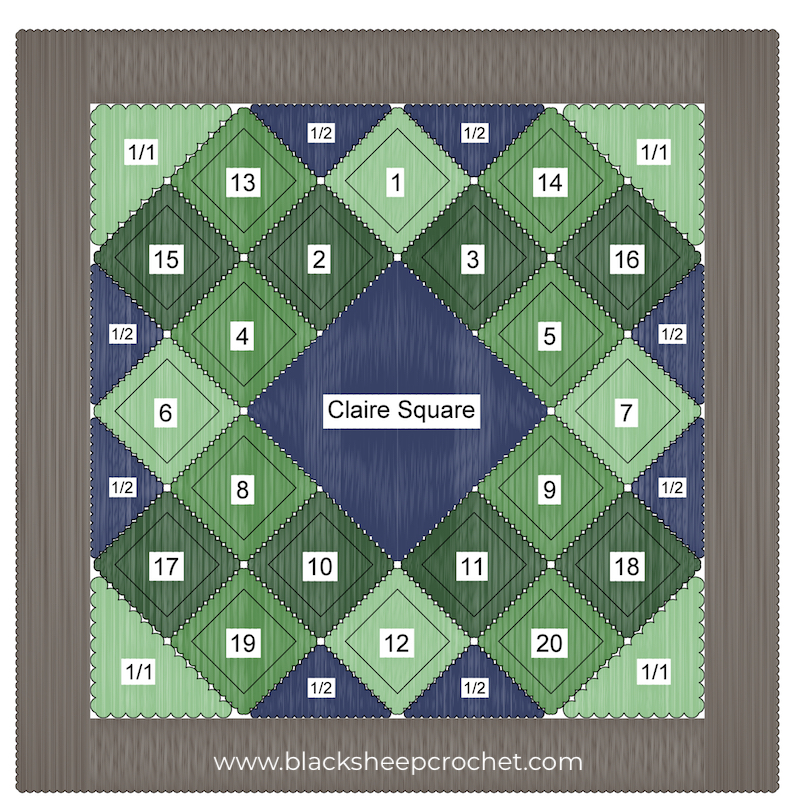
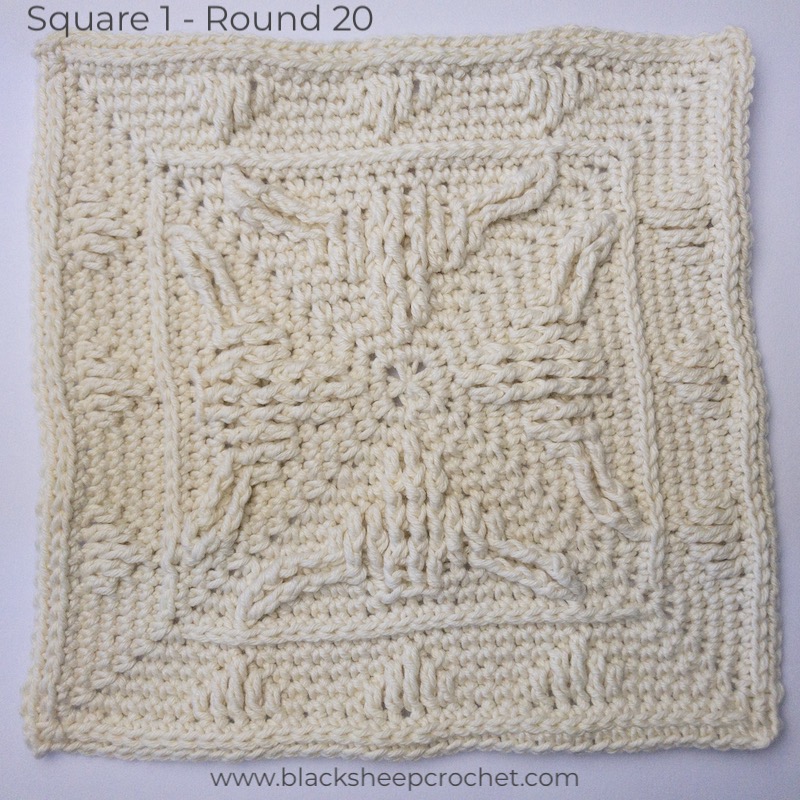
Special Stitches in Round 12:
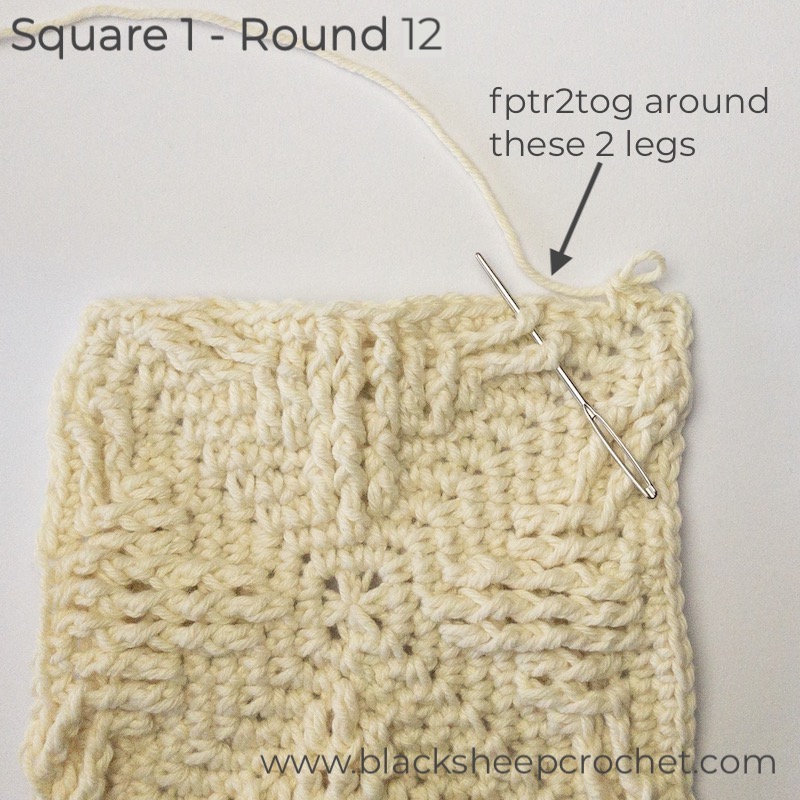
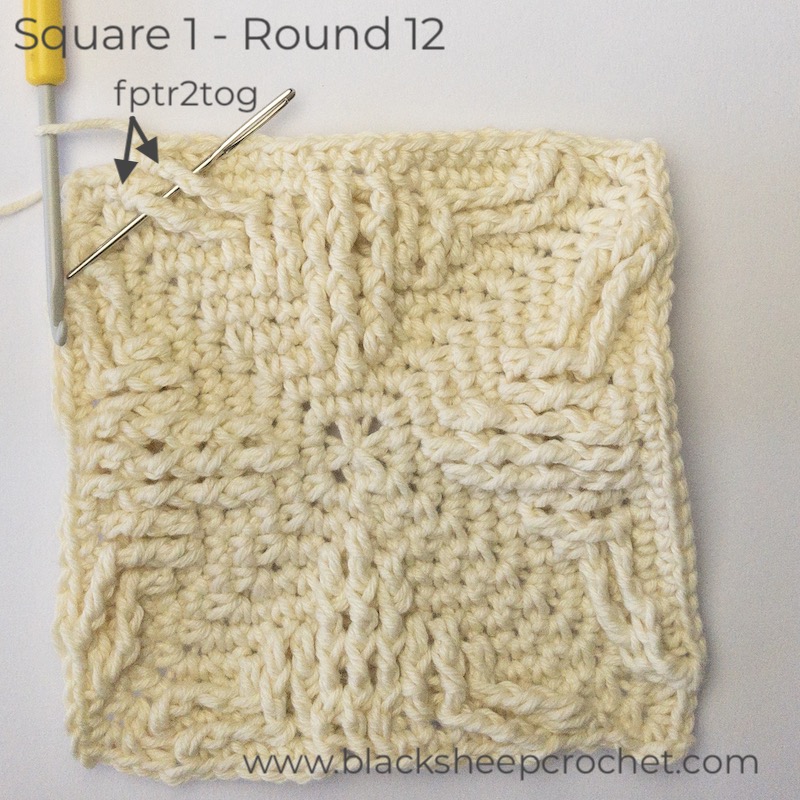
Fptr2tog-a – 2 front posts together with first leg around the fpdtr from 2 rounds below (Round 10) and second leg around the other fpdtr from previous round
Fptr2tog-b – 2 front posts together with first leg around the fpdtr from previous round and second leg around the other fpdtr from 2 rounds below
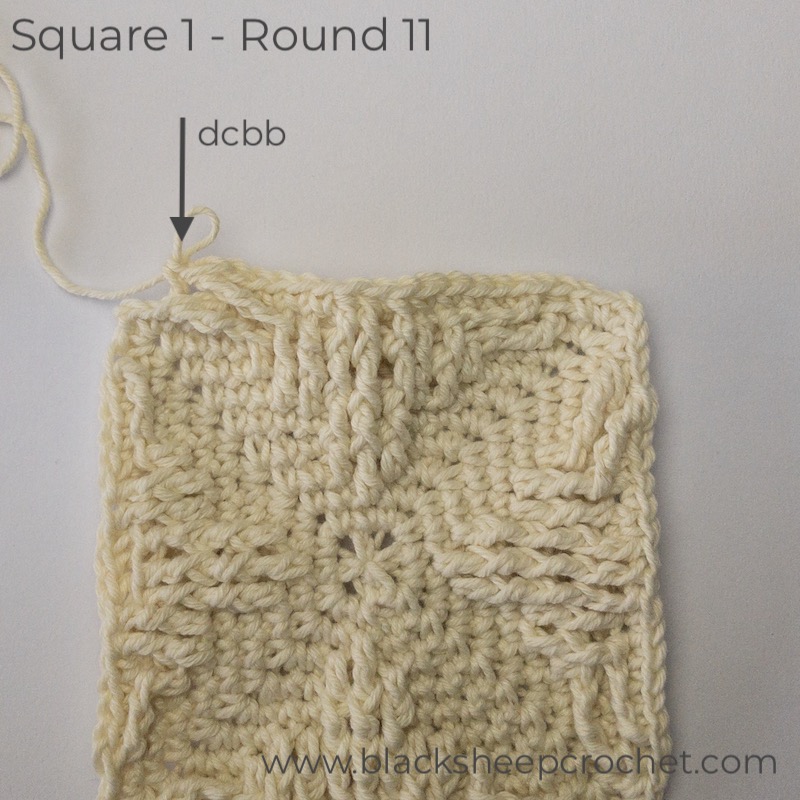
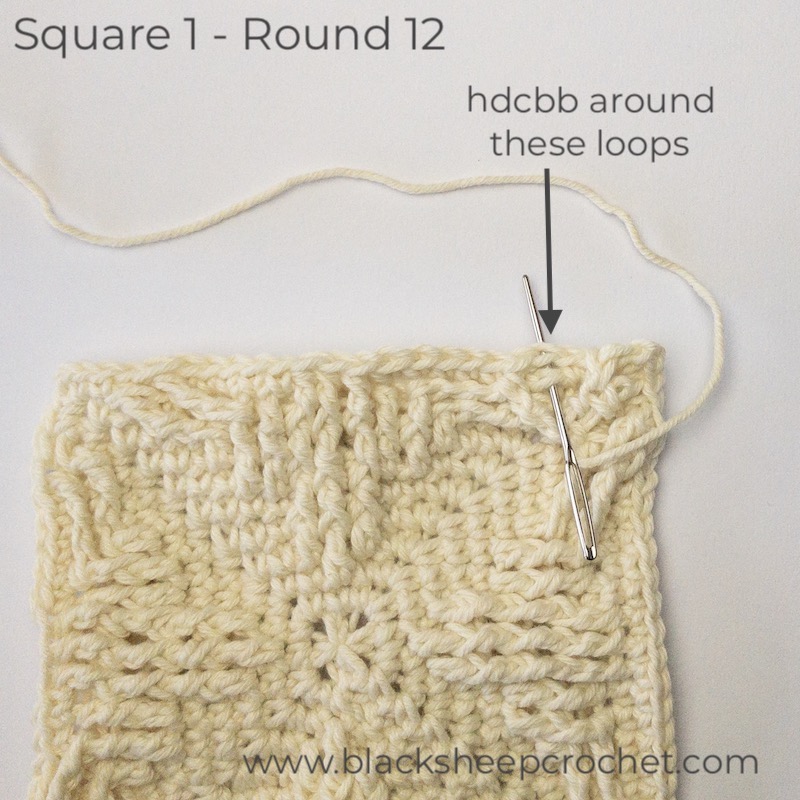
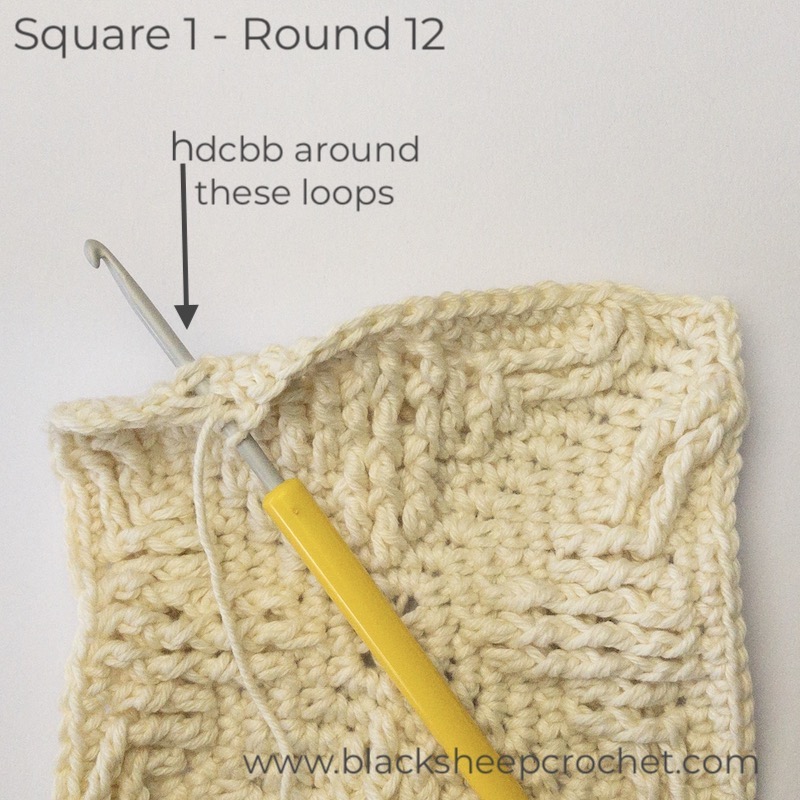
Hdcbb – half double crochet behind the top loops of the stitch from round 10
Hdcbb-x – half double crochet behind the fpdtr from previous round (insert hook through both loops of next stitch and then through both loops of the st 2 rounds below – round 10)

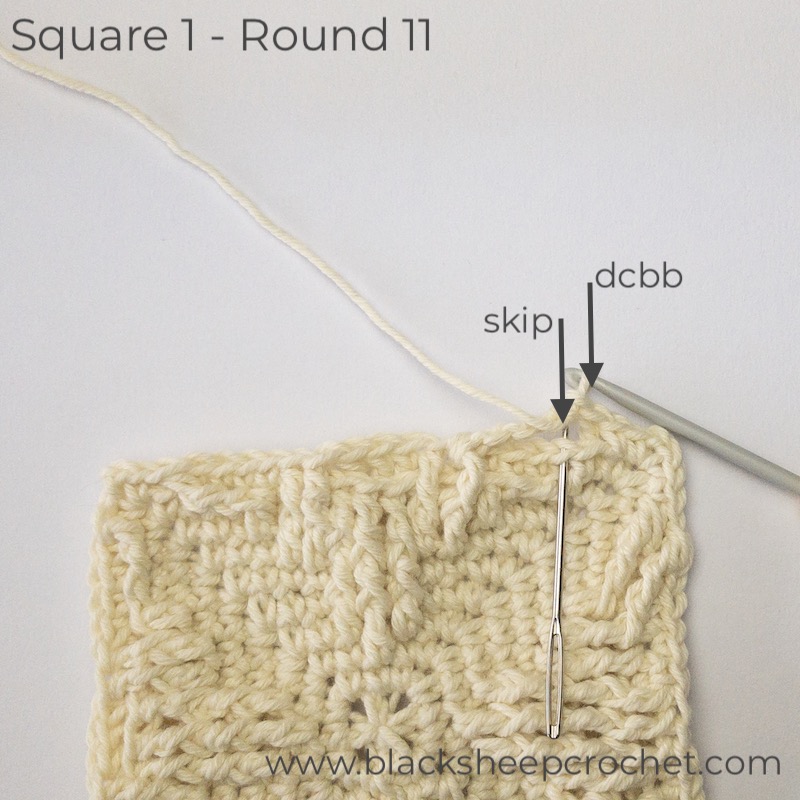
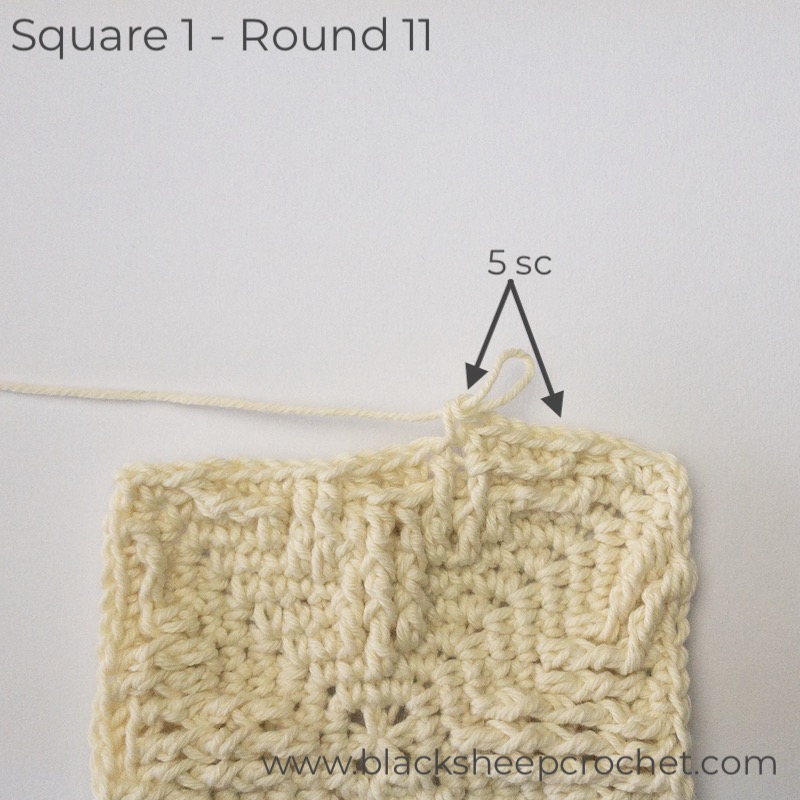
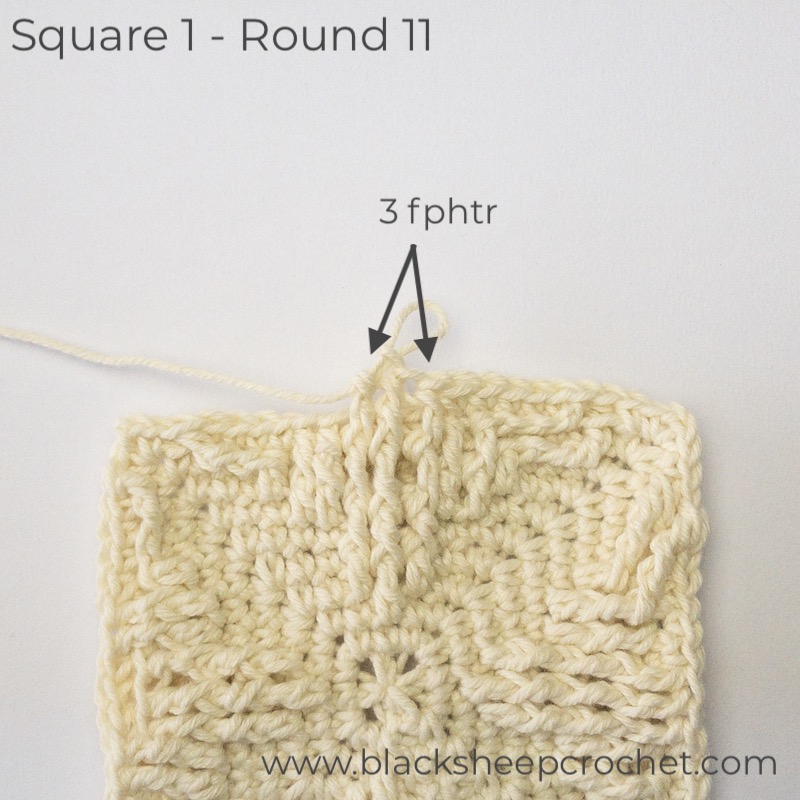
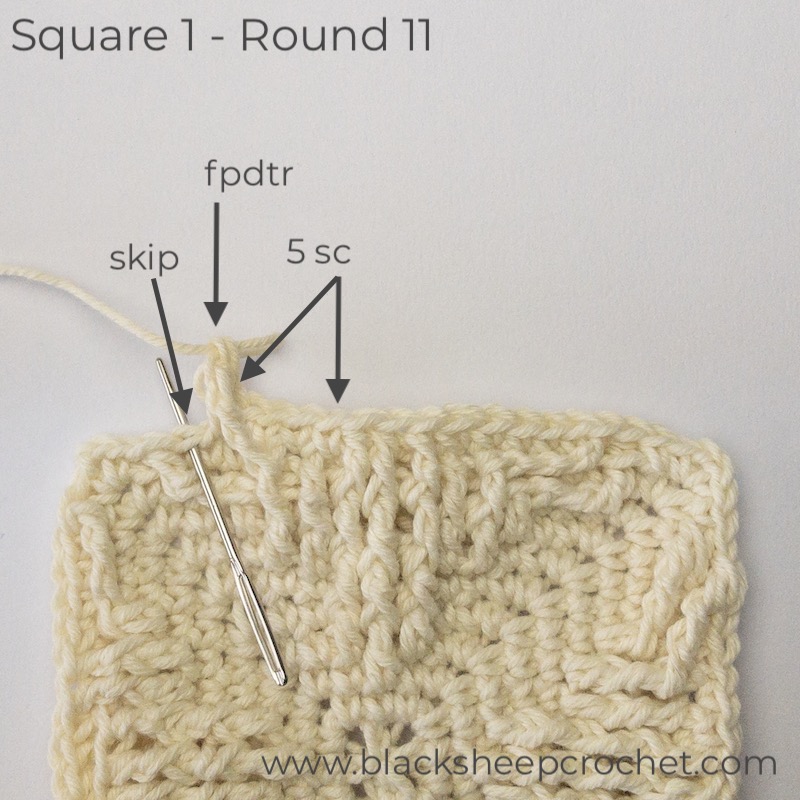
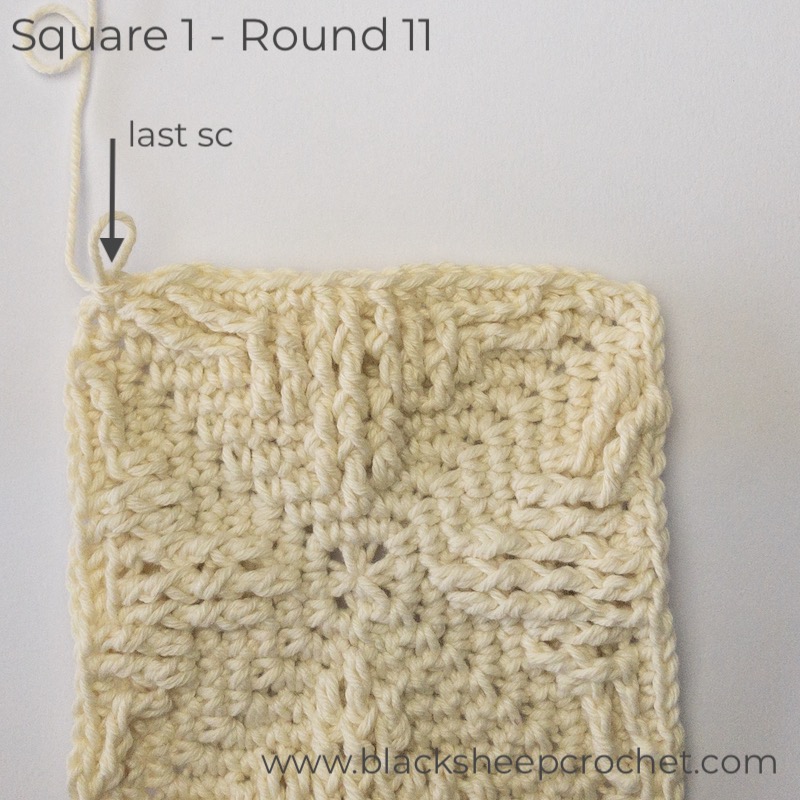
Round 12: Ch1, [(sc, ch2, sc) into the ch2 corner space, sc, fptr2tog with first leg around the fpdtr from 2 rounds below (Round 10) and second leg around the other fpdtr from previous round, sc, hdcbb-x behind the fpdtr from previous round (insert hook through both loops of next stitch and then through both loops of the st 2 rounds below – Round 10), *5 sc, 3 hdcbb, 5 sc, hdcbb-x as before, sc, fptr2tog with first leg around the fpdtr from previous round and second leg around the other fpdtr from 2 rounds below, sc] 4 times. Ss into the top of the first sc of the starting corner. – 23 sts per side plus ch2 corner space

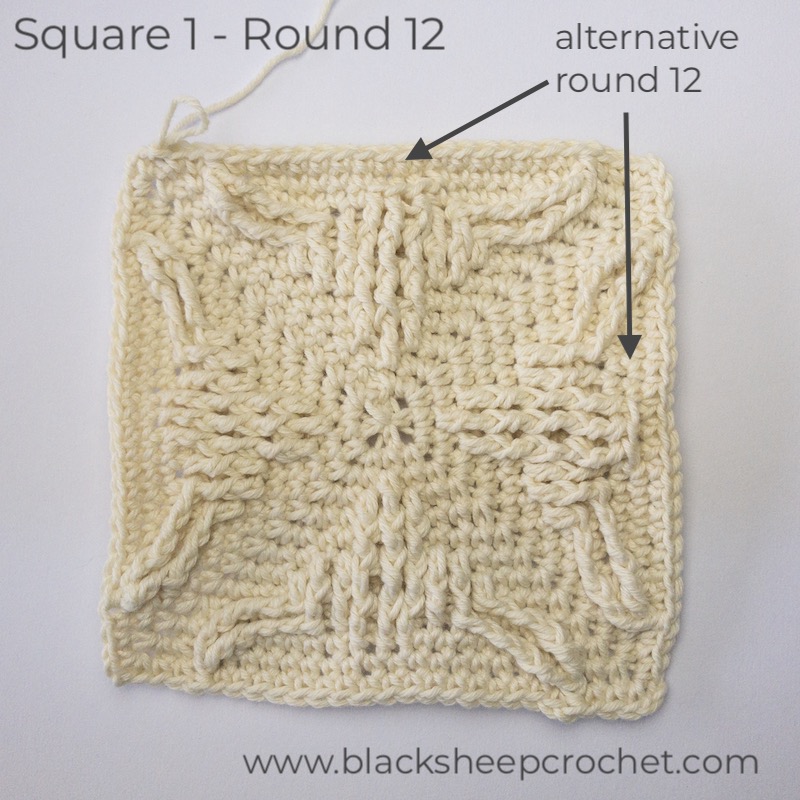
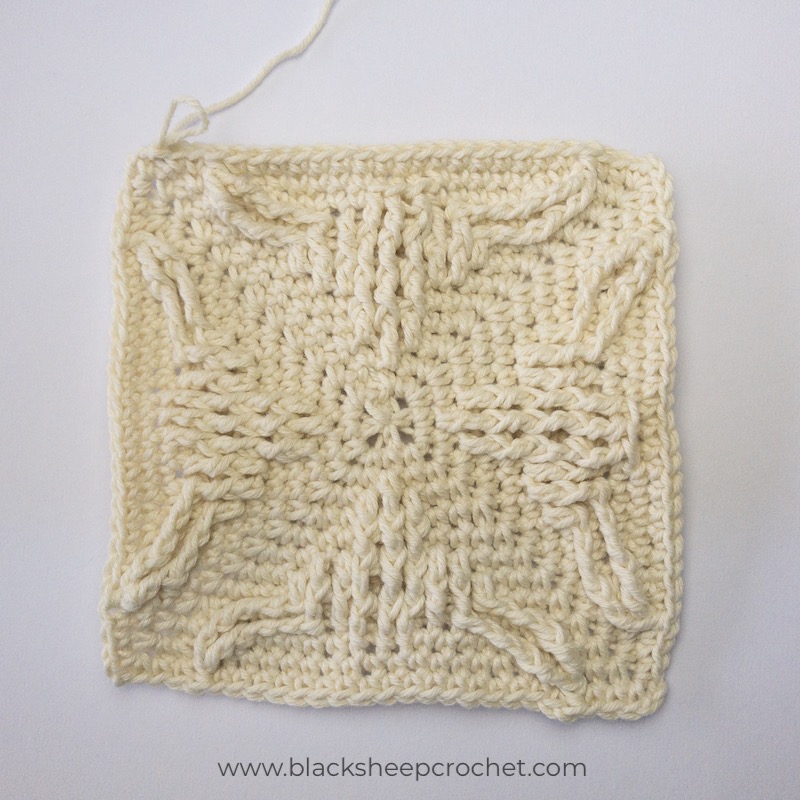
*This will give the top of the Ox head a different (sharper) definition. Please refer to the photos or simply try both versions to see which you prefer.

Alternative Round 12: Ch1, [(sc, ch2, sc) into the ch2 corner space, sc, fptr2tog- a, sc, hdcbb-x, 13 sc, hdcbb-x, sc, fptr2tog-b, sc] 4 times. Ss into the top of the first sc of the starting corner. – 23 sts per side plus ch2 corner space

Special stitch in Round 13:

Fphdc – the front post half double crochet in this round is made around the fptr2tog from the previous round

Round 13:

Work the stitches in this round loose. It will benefit you in Round 14

Ch1, [(sc, ch2, sc) into the ch2 corner space, 2 sc, fphdc, 17 sc, fphdc, 2 sc] 4 times.

Ss into the top of the first sc of the starting corner. – 25 sts per side plus ch2 corner space

Round 14:

Ch1, [(sc, ch2, sc) into the ch2 corner space, sc in 3rd loop of each of the sts across] 4 times.

Ss into the top of the first sc of the starting corner. – 27 sts per side plus ch2 corner space

Round 15:

Ch1, [(sc, ch2, sc) into the ch2 corner space, 4 sc, (sc in BLO of next st, 8 sc) twice, sc in BLO of next st, 4 sc] 4 times.

Ss into the top of the first sc of the starting corner. – 29 sts per side plus ch2 corner space

Round 16:

Ch1, [(sc, ch2, sc) into the ch2 corner space, 4 sc, (sc in BLO of next st, sc in BOTH loops of next st, sc in BLO of next st, 6 sc) twice, sc in BLO of next st, sc in BOTH loops of next st, sc in BLO of next st, 4 sc] 4 times.

Ss into the top of the first sc of the starting corner. – 31 sts per side plus ch2 corner space

Round 17:

Ch1, [(sc, ch2, sc) into the ch2 corner space, (4 sc, sc in BLO of next st, sc in BOTH loops of next 3 sts, sc in BLO of next st) 3 times, 4 sc] 4 times.

Ss into the top of the first sc of the starting corner. – 33 sts per side plus ch2 corner space

Round 18:

Ch1, [(sc, ch2, sc) into the ch2 corner space, 5 sc, (dc in FLO of next st one round below, htr in FLO of next st 2 rounds below, tr in FLO of next st 3 rounds below, htr in FLO of next st 2 rounds below, dc in FLO of next st 1 round below, 4 sc) 3 times, sc] 4 times.

Ss into the top of the first sc of the starting corner. – 35 sts per side plus ch2 corner space

Round 19:

 **Work the stitches in this round loose. It will benefit you in Round 20
Ch1, [(sc, ch2, sc) into the ch2 corner space, sc in each st across] 4 times.

Ss into the top of the first sc of the starting corner. – 37 sts per side plus ch2 corner space

If you choose to use a different colour for the border, now is the perfect time to fasten off the first colour, weave in the tails and attach the new colour in any of the corners.

If you are not intending to work the square border, skip to Round 20.

Although you could add the new colour in any way you wish, the neatest way is by using a standing sc. If you choose this method, omit the ch1 and the first sc at the beginning of Round 20 and continue with the ch2 after the standing sc.

Round 20:

Ch1, [(sc, ch2, sc) into the ch2 corner space, sc in BLO of each st across OR sc in the 3rd loop of each st across] 4 times.

Ss into the top of the first sc of the starting corner. – 39 sts per side plus ch2 corner space

Congratulations! Your Square 1 – Year of The Ox is now finished (unless of course you want to continue with the square border).

This blog post contains affiliate links. I only link to products or services that I use, would use or that I think are beneficial and of high quality standard for my Black Sheep Crochet flock. 

Did you know that I offer a 20% discount on my products and patterns for my VIP Black Sheep Crochet Flock Members? You can sign up below for the instant discount code. I don’t spam or anything gross like that!

Feel free to share this with your friends on your favourite social media network

Enter Your Email to Claim Your INSTANT 20% Discount Code on Products and Patterns

* indicates required

Black Sheep Crochet will use the information you provide on this form to be in touch with you and to provide updates and marketing. By signing up, you understand that sometimes emails may contain news about to-pay-for products or services, special promotions or sales. However, we do not spam and you can opt-out any time.

Spam sucks, which is why I will treat your information with respect.