‘How to…” – Working Stitches on the Next or Previous Side

Black Sheep Crochet designs are all about writing stories in yarn.

We combine stitches to literally or figuratively depicture a theme or story element, a character or a mood of a story. 

For that, we ‘weave’ different stitches together, work around, behind or into them and we add decorative embellishments of all sorts.

Working on the next or previous side

When working close to a corner, it can sometimes happen that we start a stitch on one side and anchor it forward over the corner on the next side (ons)  or backward over the corner on the previous side (ops).

Stitches on the next side

How to work a stitch on the next side

Usually our “0” reference point is the next st, but here “0” is the ch2 space of the next corner.

Example:

dtr_+3-1 in FLO-ons double treble in the front loop only of the st 3 ahead and 1 round below on the next side

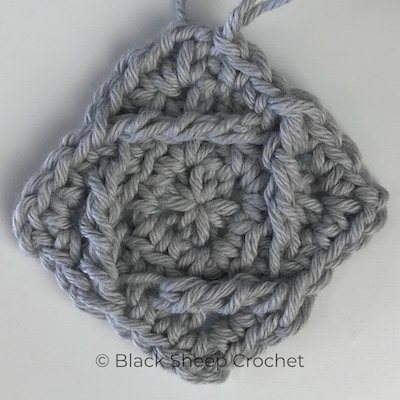
A treble is to be worked in the front loop only (indicated) OR both loops of the st 3 ahead and 1 round below on the next side (indicated)

Repeat on side 2 (indicated) and side 3

On the last side, work in the FLO of the st below the special st already made (indicated)

A dtr-ons_+3-1 in FLO has been worked on each side of the square

Abbreviation indicating a stitch to be worked on the next side

You will find an –ons.. after the stitch placement abbreviation when a stitch should be anchored on the next side of your square or other kind of multigon

  • i.e. dtr_+3-1 in FLOonsdouble treble in the front loop only of the st  3 ahead and 1 round below (the corner space) on the next side.

Stitches on the previous side

Usually our “0” reference point is the next st, but here “0” is the ch2 space of the previous corner.

Example:

dtr-ops_-3-1 in FLO double treble in the front loop only of the st 3 behind and 1 round below (the corner space) on the previous side

When working backwards, on side 2, 3 and 4 we need to remember that we have now already worked Round 0, our current round, over the stitches. In order to be consistent, we need to keep working in the FL of the same round as before, which in the example is the round “-1” – 1 round below, not “0” – the current round (pics. 1 & 2 below).

A treble is to be worked in the front loop only (indicated) OR both loops of the st 3 behind and 1 round below on the previous side (indicated)

Repeat on side 2 (indicated) and side 3 
Note: the FL we want to work in is that of Round -1 (indicated) NOT the round we currently work in, which would be Round “0”

On the last side, work in the FLO of the st below the special st already made (indicated)

A dtr_-3-1 in FLO-ops has been worked on each side of the square

Abbreviation indicating a stitch to be worked on the previous side

You will find an –ops.. after the stitch placement abbreviation when a stitch should be anchored on the previous side of your square or other kind of multigon

  • i.e. dtr_-3-1 in FLOopsdouble treble in the front loop only of the st 3 behind and 2 rounds below (the corner space) on the previous side.

Stitches on the next side or previous side in rounds further below

Example:

dtr-ops_-3-1 in FLO double treble in the front loop only of the st 3 behind and 1 round below (the corner space) on the previous side

dtr-ons_+3-2 in FLO double treble in the front loop only of the st 3 ahead and 2 rounds below (the corner space) on the next side

dtr-ops_-2-2 in FLO double treble in the front loop only of the st 3 behind and 2 rounds below (the corner space) on the previous side

On the next side, count 3 sts ahead of the corner space, …

On the previous side, count 3 sts behind of the corner space (disregard the ch1!), …

… then 2 rounds down (indicated FL) “-1, -2”

… then 2 rounds down (indicated FL) “-1, -2”

On the 2nd and following sides, count “0, -1, -2…” to compensate for the round you already worked

Connecting stitches from two sides

The closer to a corner a st is worked on the next or previous side, the flatter it seems. Interesting effects can be achieved by working back into the same front loop on a previous side or as front posts around a st on the next or previous side.

a st on the current side is worked in the same FL as a st on the previous side

a st on the current side is worked as a front post around a st on the previous side

Video Tutorials (in the making)

Right-Handed

Left-Handed

You can find a collection of all available free tutorials here:

Black Sheep Crochet Tutorials

More Free Tutorials

‘Petranese’ explained –
dcbb – double crochet behind and below

‘Petranese’ explained –
hdc/hdcbb or double hdc tutorial

‘Petranese’ explained –
Long dc Star (5 legs) tutorial